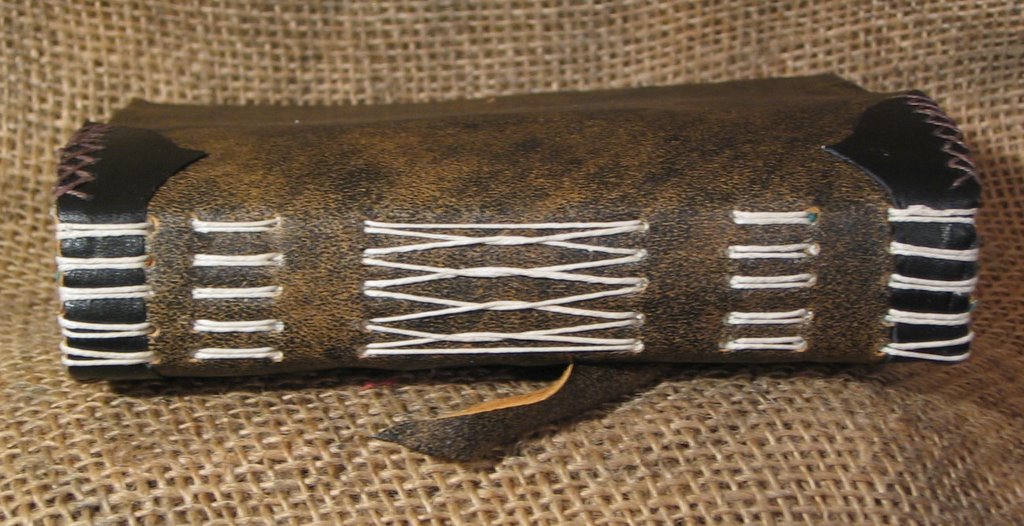
FRANKEN JOURNAL

This would a be a perfect update for halloween,but it’s a week or so too early!

I finished what I’m now calling the “franken-Journal style” (Thanks Bart!) journal.

It’s big, 8×10 inches, 200 pages of 90lb drawing paper and a unique sewing that is based on how the patches that were randomly sewn across the hide went across the spine. The pictures don’t do this oil tanned leather justice. Its a chocolatly brown with darker deeply textured patches and great patterning across the whole thing. The black patches were first glued down and then sewn through the cover. It’s all sewn with blacklinen thread. i used as accent some red cotton stitches but I”m not sure how I like them. They are nice enough but I’m not in love with them.

Some FrankenJournal love:

3 down and so many to go!

Well, I just put the finishing touches on 3 journals and all 3 complete orders. How fantastic is that? I’m pretty excited about it all. i’ll post plenty of pics tomorrow. Its funny how fast time flies by when one is doing something they love.

So tomorrow pictures and lots of them!

Paper

I’m searching for a paper. A paper thats good for light watercolor washes, collage and smooth for writing, it’s foldable for binding and isn’t too expensive. I’m making a book for someone and they need paper that can handle all those types of work. It also needs to be oatmeal colored. I’m thinking a trip to boston may be in order for this one.

I’m thinking Stonehenge or somerset paper may be the way to go. Both are good printmaking papers that can withstand intalio as well as block printing. Meaning they are tough and stand up to abuse.

If anyone else has any ideas eitehr email me or leave a note on here.

attack of the killer hedgehogs

including the 2 hedgies i’ve got up on eBay right now i’ve made 9 hedgies in the last week or so. This is on top of working on designs and cutting covers for custom orders.

I strongly believe that on my current art based income i could live in reasonable poverty if I were to move back to Maine, of course this would involve moving back in with my family and living in an area that is best called lovingly remote. I believe at as one enters into their 30s that living with family is well, for the birds. (can you tell that I recenly had a birthday?)

Anyhow enough of my rambling I’ve got more work to do here before I head for bed so I’ll leave you with a nice shot of Hedghog love:

Photo set up

I’ve been asked about my photo set-up. It’s pretty simple. I have a rolling metal cart that I put up against the wall. I use binder clips and non-maring poster putty to hold my backdrop up. I’ve used just tacks in the past. I’ve also used a chair. the main thing is that you need a right angle to hold your backdrop and your item.

Because I have a DayJob I don’t always have a chance to take photos in the primetime of sunlight, I solved this issue by getting 2 halogen desk lamps with goosenecks. You can see them mounted on either side of my set-up. My canon camera has a setting specifically to handle halogen lamps. For a long time I used just one of the lamps and the overhead lighting in my apartment. For me it was important to get a gooseneck lamp so that I could move the light around to eliminate glare. Sometimes a shot is perfect but I’ll get glare, I move the light until I don’t see it in the picture anymore. It’s very simple.

The other item I use is also very simple- props. I have a washcloth that I secured with an elastic and a dishtowel that I tied with a scrap of leather. These let me lay my books down to get those oh so important spine shots. I like to have 2 of them to ensure I get a good angle on the books.

The only other item that is essential to a good shot of a book is a tripod. Essential, like don’t leave home without one. I picked up a basic tripod for elss than $20 at my local walmart. It has a level and most importantly an adjustable head for my camera, letting me adjust everything as i’m working.

This is the closest tripod I could find to mine:
tripod

The major difference with this to mine is that mine has a crank for the height adjustment.

Finally, I’ve turned off the flash. Flash is evil. Flash causes glare and wash out. It’s evil. That’s all we need to know about flash. When you turn off the flash it forces your camera to rely on ambient light and thus us a longer shutter timing. Which is why a tripod is so needed.

Just as flash is evil, timer is good. Many cameras have a timer setting. Use it. Its elminates most if not all of camera shake caused by pressing the button. the combination of the tripod and timer will improve shots dramtically. My shots went from slightly blury to sharp theminute I tried this out.

The final aspect of taking a good clean shot of your books is to get to know your camera and what it’s capable of. Learn the settings that it has. Take 100 pictures of a book and try out every setting and combination of settings your camera has to offer. It’s not like it has film and your losing cash with this- all you have to do is press delete and it’s gone. It’s time well spent.

My set-up cost me about $40. tripod-$20 Lamps $10 each. I scored a free burlap bag at work and had the black cloth laying around, but I think when I bought that it was $5, I bought 2 yarsd for another project. I also had soem unbleached linen. I have 3 options for backgrounds. I like the burlap because its matches the rough exterior of my journals, it’s rugged.

Hope that helps any qyestions one mught have about taking shots of your journals.

Custom Journals

I love making custom journals for people. It gets me a chance to experiment within guidelines. I think that this sort of thing was never something covered in my college art courses. I learned about stiring my creativity and geting customers but never about filling orders and how to learn what people really want. I’ve learned that through the time I’ve been making books and throguh working at the store. I think it’s skill that I’ve learned.

I’ve been working on an order for 4 journals. I’ve beengiven permission to do whatever I want withteh bindings and been told “You are the artist, let my creative vision go wild.” Needless to say I’m pretty excited about that. So I’m going to show a few pictures here of the 2 journal I”ve finished in this order. the first is a golden deer skin color. With some gray areas in the skin, also some scars in the skin. Ilove skins that are naturally distressed and show the life of the animal. It’s probably one of the reason I’m drawn towards deer and sheep hides. Not only are they super soft but they are themost interesting hides I’ve ever bought. Goats nice but somewhat boring. Cowhide is boring. Anyway, without any more digression on my part!


It’s 9×11 inch journal with 48 pages of 90lb strathmore cream drawing paper. It’s backed with canson paper in tobacco. the spine features a simple sewing of hand dyed black unbleached Irish linen thread sewn through station reinforced with antiqued copper eyelets. The photos of the spine didn’t come out well but here’s the best:

Finally the gratitous cover open shot:

The second journal is what the guy calls a “franken”journal. I think it fits. I made one of these for my friend B and it was inspired by the punk rock patches he wears on his jeans and jackets. I like the name and ithink it will stick:

It’s a standard journal cover with patches glued to the outside and then handstitched to the cover with linen thread. To sew it all the holes must be pre punched- it’s hard to push a needle with thread through leather unless you’ve pre-punched the holes.

Here’s a shot of the whole cover:

Those are the 2 most recent books I’ve made. Hope you like

Dye-ing to get it started!

I’m chomping at the bit to start binding one of the more artisiticly involved journals I’ve got on order. Mainly because it involves me using thread that I’ve dyed myself. I picked up a multi set of jacquard fabric dyes for natural fabrics. Right now I’m working on the kinks in the dye but so far it looks as though it will be nice. The dye is very very thick, not what I was expecting. I need tolook up more on how to use it but I’m testing it right now. I’ve got 2 colors going a black and a celery green.

Hedgehogs

Well, I’m pretty excited! I’ve been featured here:
http://www.moleskinerie.com/2005/09/meetthe_hedgeho.html

It’s a pretty big deal to me, I love being featured on site I love and I love the moleskinerie, it’s a great site with are and info on moleskines. To have my work featured on here is pretty exciting. It’s funny that I’ve been making these moleskine knockoffs for YEARS and finally people are taking notice. I guess the absence of the spine sewing makes them more desirable? They sew up fast and look good so I’m not complaining. I’ve gotten a load of requests over the last several days, I’m assuming it’s because of this link to my auction. A lot of people are making their way to my website and blog through eBay.

It’s quite fantastic!

Shaving Leather

The pics will show you how to shave, pare, or skive leather with a paint scraper. I use a Red Devil paint scraper with a metal body and a slide out mechanism for the razor blade. I get my razor blade from Home Depot by the 100 count box. It’s cheaper that way and the blades are less flexible than the single edge blades you can get at the drug store. You’ll need a paint scraper and something smooth to work on- I used a plexi sheet. Glass would work best, as I scratched and gouged my plexi. DON’T use your expensive self-healing cutting mat… Bad things happened to mine.


Hold your piece of leather down on the plexi with one hand and hold the scraper int eh other. Hold the scraper at about a 45 degree angle.


Now push gently on the scraper, while holding down on the leather.


If you’ve gothe right angle and pressure you’ll feel the blade catch and it will start to scrape up bits of leather. Depending on the leather you’ll get different results. I’m using a soft but fairly stiff cowhide here.


I found that short shallow strokes followed by longer gentle strokes got the best production for me and made the process faster.

You see the pile of shavings? Keep that out of the way. If those parings get under your work you’ll end up with a hole in the leather and it won’t be pretty.


Work slow and patiently other wise you’ll misjudge how much thickness you have left and cut right through the leather.

Here’s what I ended up with:


I’m able to use this method successfully on thin leather pieces and leather pieces less wide than my blade. I also found that I was able to use it on corners to successfully thin those down for a turn in. Some leathers worked better than other- thick stiff leathers withstood the razor better than soft leathers. All my cowhides worked especially well and I was able to shave them down to the mere-est surface of the skin. They also showed the least amount of stretching. Heavy weight deer hide worked pretty well too. Soft and smooth sheep hide faired the least well of all the hides tried. THOUGH the thin straps I use for bookmarks did well. Anything with texture lost that in the process.

Leather Paring

I’ve been doing a little research into leather paring. For those of you not into using leather in your books it’s the term for shaving down leather so that it’s not as bulky in some areas, like for turn ins and around the spine. I became interested in it because I was making leather place marks for my moleskine knockoffs. When I used a full leather piece along the spine it left a large lump that sometimes was more noticeable than I wanted it to be, it also made adding the hollow back more difficult. So I started thinning the leather with a flat exacto. My blade was too thin so it snapped. Then I tried a click-knife with some success. I was able to thin down the leather quite thin but not enough. I wanted the leather under the hollow back paper-thin.

Using the click knife and the exacto led me directly to my toolbox and a somewhat unusual tool- my paint scraper. You know one of those tools 100 different companies put out for a couple of bucks used for scraping paint off the windows when you over paint? Yeah, one of those. Mine is old and filled with acrylic paint and old printers ink (A required tool for my printmaking course back in college- used it for scraping ink off the tables.) I put in a fresh blade and started to scrape away with the same motion I used with scraping the paint. Thin slivers and dust scraped off the back of the leather, Different pressures resulted in different cuts- some very bad.

I’ve gotten it now to the point where I can shave the bookmarks down to a paper thin edge that is barely noticeable on the spine and tapers up to full thick ness in about an inch.

I’ll post some pics and details later,but I noticed several key points- don’t do it on your expensive cutting mat- very bad things happen. Scrape on a sheet of plexi or better yet glass, and make sure it’s clean a small [piece of dried glue or leather shavings results in tears and cuts through the surface. Some leathers perform better than others- sheepskin didn’t perform so well but cowhide was great. Deer did well too. This technique dulls the blade very quickly, I went through a 5 pack in my trials.

More thoughts and pictures when I don’t have to go to work.