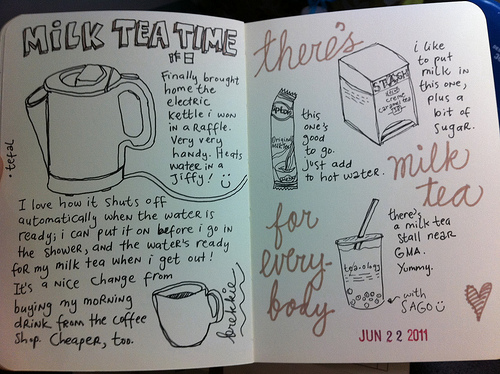
I adore this guy's travel journals.
I adore this guy's travel journals.
Dave asked me on YouTube to link up my favorite fountain pens. So here’s a list:
Kaweco Sport– I like it for it’s ability to fit discreetly in a pocket and be converted to an eyedropper. (at jetpens)
Platinum Preppy– for $3 it’s a workhorse, it comes in an array of colors and can be converted to an eye dropper. (at jetpens)
Lamy– To get this to convert to an eye dropper you need to find a clear tube to fit inside the case or find a matching roller ball. Even then you need to epoxy the vents. In my opinion it’s worth the hassle you can get interchangeable nibs and expand your nib size for not a lot of money. (at jetpens)
TWSBI– the most expensive of my pens, it lays down a smooth even line and its a joy to sketch or write with. (not available at jetpens)
Pilot Parallel– These come in a range of sizes and I think act more like a paint brush than a pen. I have a 6mm size and it lays down an awesome swath of ink. (not available at jetpens)
Inks:
Private Reserve– I enjoy their shades of blue. (not available at jetpens)
Diamine– I enjoy their chocolate brown shade. It’s deep it’s dark it’s really nice. (at jetpens)
I hope this list, though not exhaustive helps out make some choices about what fountain pens to start out with and if they are for you.
Please note that I am not compensated for linking to these particular sellers, I link to them because I’m a happy customer who has recieved nothing but top notch service from both sellers. I’m happy to steer people in their direction.
Check out this epic Moleskine, every single page is packed with awesome line work and amazing detail.
Check out this sweet sketchbook I found while checking out YouTube, great stuff.
Was written in my big red miquelrius gridded journal with a fountain pen, a Pelikan Go! With red noodler’s ink. It was a transformative moment for me.
After a brief hiatus the art adventures are back on! This week Jane and I headed to the MFA in Boston to see the (new to me) Art of the Americas wing. It’s pretty darn sweet. It also renewed my interest in some of the more modern American painters.
ONe of my favorites has always been Edward Hopper for his street scenes. It is directly in line with the sort of photography I’ve been doing lately as well as the paintings I’d like to produce.
From our trip Jane and I discussed a lot of things; that we miss having critiques because they push you to do more; we miss some structure of classes and assignments, to that end we’ve given ourselves an assignment (I’ll discuss this later); additionally we miss making art adventures.
We already decided that we’re going to meet again in 2 weeks.
The assignments are going to have a theme but that’s it. We can work any size and any medium as long as we stick to the theme. This week’s theme is pretty easy, “Create a piece inspired by our visit to the MFA.” It couldn’t get much more open than that, given that we looked at work on paper, sculptures, drawings, photography, and stuff from all time periods.
So far I’ve decided I’m going to go with a painting of a local business Hooper inspired, probably China River or Super Chicken and most likely work in acrylic on stretched paper. I haven’t figured out size yet, but that will come with time.
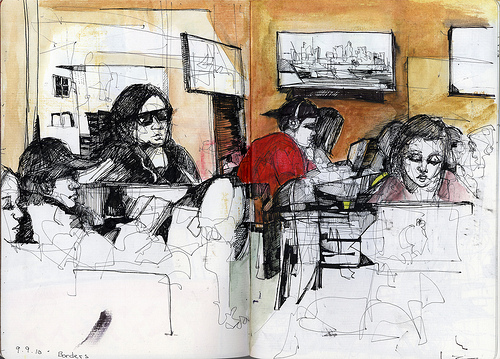
I leave you with this guy drawing in the MFA, I'll scan some of my drawings from our coffee sessions and from the train station.

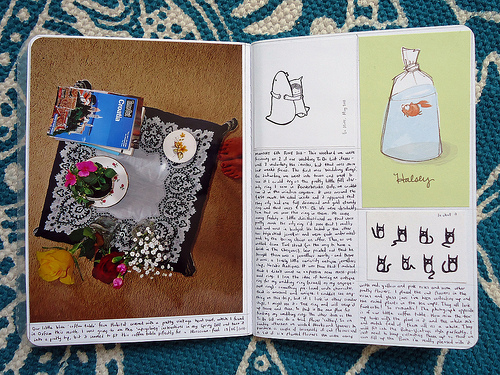
This journal page by This Chicken reminds me of Pinterest. Anyone else remember having a journal you stuck images from a magazine into, or an inspiration board?
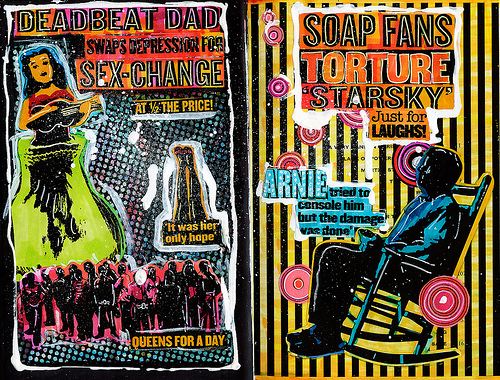
Sure, the topic is crappy but the image pops like whoa! The black on the bright colors really keeps me looking. RcannonP does great things with color.
The title of this one is Austin Borders. I am pretty sad to see Borders go bankrupt. It was one of the first mega bookstores in the area where I went to college. I've met up with friends and dates in the cafe. I've spent hours studing and drinking coffee at the Bangor, Maine location.
Anyway, Borders closing makes me sad, Vicandwilliam serves up a poignant journal page.
For what it's worth, I also frequented the local book shops in Bangor, ME. Lippencott and Bett's Books were 2 favorites of mine, I would frequently find great deals on used books in their shelves, I think I paid about $10 (in 1997 money) for a used copy of the Apocrypha. Does anyone remember the name of that place in the basement on a backstreet in Bangor, where the guy had every issue of PlayBoy in his used magazine sales rack?