Author Archives: leslie

Review: The Artist’s Way (BOOK)

I am seemingly one of the few artists (journalers) who is not in love with Julia Cameron’s The Artist’s Way. Don’t get me wrong, I’ve read it, I’ve got it on my bookshelf, complete with the bookmark exactly where I left off. Sometimes I feel like I’m the only one who isn’t telling everyone else what a great book this is, recommending it every time someone I know hits a block.

It’s not that I don’t get it or that I don’t think it’s a wonderful book, it simply didn’t resonate with me. Sometimes I feel guilty that I’m just not that into TAW. Someone once told me that to follow TAW was a commitment, and I have to agree. There are groups online to help you get into TAW as well as a workbook, and at some community colleges you can take a course in TAW.

Reading TAW or taking a course in TAW can be a transfomative experience for some people, at the end of the line, the real message behind TAW (and all it’s look alikes) is that you need to spend time making and thinking about art.

If you think this might be a good book, pick it up. Maybe I'll revisit it, or not.

Wordy Wednesday: Professional Presentation

I was the sort of art student who loved the “outsider” art tacked to the walls in the basement of the official art shows in college. It was raw and rough. I liked the look.

There came a time when I grew up and I realized that even some of the most rough and rugged art looks great or even better when framed. It’s true. A frame sets art off from the wall, enshrines it and best of all emphasizes it.

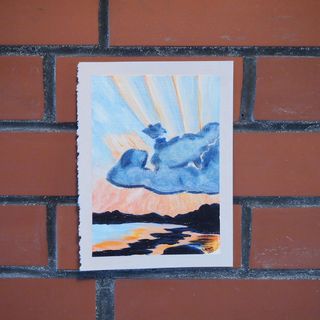
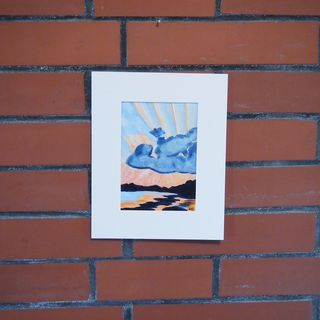
Case in point, take a look at this image I painted of a sunset. It’s a small 5×7 inch painting. Alone on the wall it looks lost, even with the clean taped edge.

  P7191335

Stick that same image in a mat and wow, it looks so much better. As much as my 19 year old self would grumble at the added expense, this DOES look better, even in JUST the mat. Now imagine if I framed that image?

P7191333

A friend of mine calls this effort, I call it extra work and added expense. But I’ve come to realize that IF I want to sell my art I have to appeal at least in part, to the buyers of art, not to my inner 19 year old rebel. Part of that appeal is handling my art in a professional manner- matting it up and placing it in a Krystal Seal bag or framing it when necessary.

I really do think that it looks a lot better when matted and those Krystalphane bags really do a great job of snazzing them up, giving you a good idea of what the piece will look like under glass.

Plus take a look at the prices on the mat and Krystal Seal bags I linked, those are pretty cheap.

Technique Tuesday: Rolling Gesso

I’ve forgotten where I learned this technique but I know atleast one of my professors from college used this for the first few layers when prepping his boards and canvases for painting.

And that is to use this:

(Imagine there is a picture of a small foam paint roller here, ama zon is being a dink and won't let me link it up.)

To roll on the first several layers of gesso.

I’m using a heavy foam roller, 4 inches wide by about 1 inch in diameter. It lays down a even coat of gesso, in the exact same texture as when applying wall paint, a pebbled texture that looks like an eggshell. The thicker the gesso the higher the peaks.

The one down side is that the roller holds a lot of gesso, so it’s best to plan ahead and cover a lot of paper or canvas when you are rolling gesso. It’s also effective to get a perfect smooth surface with much less work than using a brush. (Another downside is that if you are rolling the roller away from you it will kick up a lot of fine even splatters, it will coat a new black shirt in sand like dabs of paint. This may or maynot have occured in real life.)

I used the roller as if I were rolling ink onto a plate. Then rolled it onto the paper or board as if I was painting a wall. I allowed it to dry between coats and I did not sand at all, I enjoy the texture.

Pour Some Gesso on Me!

I’m at that point in a painting where I want to dump a gallon of black gesso onto its surface and start all over.

IMG_3209

Here’s the thing, I go through that with every painting. It’s a given that I hit a stage where I just hate it, hate the colors, hate the texture, hate how rough it is, and think it’s never going to get to a point where I’m happy with it.

Then I push through it, add another layer of paint, maybe some glaze, more white here, a little green here, maybe a little yellow, and soon enough it shapes up to  be closer to where I want, and then a little closer until I’m happy with it.

The problem starts when I don’t push through that barrier. If I let it go and stop working then I lose momentum and soon enough I’m staring at that crappy unfinished painting on the easel that lack clarity and mojo.

I’ll press on but I need a break from the painting but tomorrow I’ll be back at it.

flowers

One of the many jobs I've had is as a floral designer and florist. Pretty shocking isn't it? I've had said of me, "you are the least likely florist" "not the person I'd go to for flowers but you do a damn good job" "when I saw you I didn't think you'd do a good job, but these are awesome." Me being a florist is slightly ridiculous but I have always enjoyed flowers since I was a small child. My father was an avid gardener, in spring he'd dig up pieces of his  day lilies and narcicus, toss them in the back of his work truck with a shovel and when he'd read the meters at homes with neat flowers, knock on the door and offer a trade. He was younger at teh time, and I'm sure his smile coupled with whatever line he used got him the trades he was interested in.

Funny thing is, people with gardens like to trade for things they don't have already, using my father's model of digging up pieces of flowers I've traded with other people. I also like to give chunks of my plants as gifts.

My pink day lilies are unusual and most people love them. Anyway, I went to the Lynch Park gardens and snapped a few shots. These are straight out of hte camera, which will take square pictures. The garden does NOT have it's plants labeled which drives me nuts, I'd at least like to know the common names of the varities.

_7141069

The above is a picture of my pink day lily. 
_7141069
_7141069
_7141069
_7141069
_7141069
_7141069

some more pictures

I'm being a terrible blogger these last couple of days. Just know it's for good reasons, m'kay? So here are some pictures I took over the last week or so. _7141066

 These are PINK day lilies. I never thought I'd be a fan of them but these kick ass, and people like to trade other day lilies for them. This is a nice sunset shot of one.
_7141066
_7141066
_7141066

Apparently my city has a couple of "working" docks and not just docks for fancy boats. In this case, a  lobster boat is at the dock. 
_7141066

*SIGH* Teenagers and Jager go hand in hand, sadly the drunk teens leave "stuff" behind. This will make some great sea glass later- dark gree is great. (I also found some err used "protection" in the beach trash. Seriously people, dispose of it in better ways!)
_7141066
Another shot of the lobster boat. This may become a painting later this winter, or not, who knows.

Taht being said, I'm getting to know the camera better and I'm thinking more about the shots themselves, not just pointing and shooting. I'm better at composing a scene just by looking than I am through the lens, I guess years of en plein air painting has some positive effect. I've figuring out how to start teh pricocess of applying how I look when I'm painting to the lens of my camera. It's not that different, it seems to be about looking around, like i do when I'm painting and then holding up the camera and clicking.

Wordy Wednesday: Paint Observations

As i was mixing my color swatches I noticed a few things. first, the Liquitex Basics colors are thinly pigmented. it’s great that they are relatively pure pigments but many colors that are not traditionally considered truly transparent are, due to the low pigment load. Now this is not much of a problem when you are using colors straight out of the tube but it becomes an issue when mixing shades and tones.

It’s great for mixing thicker glazes where you want some brush strokes to show through. but you may find that when you are mixing colors that you reach for those colors that have a low pigment load more and more often.  while a 2 ounce tube of Liquitex heavy body cadmium yellow light is $12- $8 and a 8.5 ounce tube of basics is $8 you’ll find the tube of the heavy body last longer because you’ll use less due to it’s EXTREMELY heavy pigment load. Meaning I can mix more greens with the heavy body versus the Basics. The 8.5 tube of basics has less than a ¼ of teh pigment that the 2 ounce tube of heavy body contains. (that could just be dramatic but it’s significantly lower.) Roughly saying a 2 ounce tube of the same color could last 4 times as long as the same tube of Basics.

I should do a measured experiment to prove my theory but I’d rather use my heavy body paints for painting…

The other observation that I made is that many colors have an inconsistent texture or consistency. The tube of cadmium yellow light is like spackle where with tube of cadmium yellow medium is thin like heavy cream and the cerulean blue is like greek yogurt. When i open a tube of Liquitex heavy body (or golden heavy)  the consistency is the same thick buttery texture, across the board for every color, unless I add gel or air brush medium.

Treat yourself to one of those pricey tubes of artist grade colors, you’ll appreciate how much longer they last versus the student grade. The texture is also very very nice. Also there is nothing that says you can’t mix and match artist/professional grade with student grade.

Technique Tuesday: Watercolor Water Application

This week’s technique Tuesday is ridiculously easy.

It’s this:

IMG_3196
IMG_3196

I know, you are thinking, it’s a bottle with water in it, with a narrow tip. You think I’m crazy. Hold up, let me explain. This is a fabric dying squeeze bottle. Available for about 80 cents at artist & craftmans. People who dye stuff use it to apply tiny small precise amounts of dye to things like silk. It will dispense a fine line or a single drop of liquid.

I read a blog post that suggested that people use an old eye drop bottle to apply controlled droplets of water into a watercolor palette instead of a mister bottle to wet the palette, which is what I’ve been using until now. As many of you who have been reading this for any period of time know, I have allergies, I use massive amounts of eye drops so I don’t look like I’m crying constantly. (Seriously I use a lot of them.) Anyway, I’ve kept the bottles until now to use with ink. But the last time I was at A&C I was poking through the small baskets of stuff and found these (apparently I did this once before too as I found another of them) little bottles. At 80 cents Jane and I both bought one.

And it’s perfect, it dispenses one perfect drop or several with ease and only in the pan I want it in rather than EVERYWHERE like the mister.

It also keeps the water pristine, I’d like to see you stick a brush into the tip! It fills easily, either by sucking water in or by removing the little tip and running it under running water.

Technique Tuesday: Watercolors

I enjoy my watercolors, a lot and I'm always looking for fun new techniques to try out> Eveline sent me this link to a guy she mentioned could be the British Bob Ross, and I have to say she might be right. I really enjoyed his tutorials! Go check them out.

You can also sign up for  a download of a 60 page PDF of his watercolor book, it's actually a very worthwhile download. A lot if these free downloads are worthless junk, this one however is filled with practical information. Things like paint strength, adding water to a wash of color and things you learn as happy accidents. Good stuff and a great cult of stuff download to get you thinking about practical use of paint and how to manipulate it for the results YOU want. Go sign up and download it.

Paint Swatches

After my art adventure with Jane Saturday I really wanted to narrow my palette down to the 8 colors I thought would work best for me. I’m not exactly sure what I’m going to do when I run out of the paints that are in the small 22ml tube sizes. I may be forced to remove the water bottle from the pochade and just use my drinking water bottle for rinse water. If I do that I’ll switch to my 40 ounce KleenKanteen instead of the 1 pint bottle I’m using currently.

I headed to the basement and painted swatches of how colors mixed with one another. A scientific approach to picking the right colors for me. I used cheap mead 3×5 inch index cards. I painted on the blank side and wrote the name of each color represented. Here are some pictures. Please be aware I did not focus on making these neat, merely on mixing 2 colors; sometimes 3 colors.

IMG_3190
IMG_3190
IMG_3190

These are held together by a 7 Gypsies cable ring that Dede kindly sent me. These things are super cool and very useful. I may have to buy a whole package of them. Or figure out how to make them…

Continue reading