Category Archives: Uncategorized

Wrap and Roll Pencil or Art Supply Case

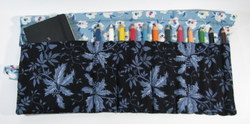
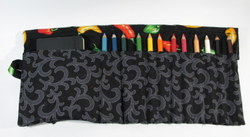
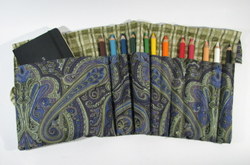
My mom kicks butt. She’s who I get a lot of my crafting ability from. Growing up she was always crocheting, knitting, cross stitching, or quilting. When she and my Dad came to visit this past holiday season, I suggested she use her crafting abilities to create a colored pencil wrap with 12 pockets for pencils and a pocket for up to a 5×7 inch notebook. She picked some awesome fabrics and made the pockets extra roomy. Here are some pictures:

Img_5359

Img_5368

Img_5380

Heres a little video of one:

Maine Vacation Journal August 2001

This video took several takes, until I realized that I had saved the ortiginal raw video on my exteranl harddrive, neverm ind I shot it 3 times. Ah the follies of learning new equipment. I should really read the manual, I did go over it I just didn’t read it indepth, then I did and a lot made more sense. So by take 2 I had a decent video. You’ll notice an increased quality in this video, it’s clear, much more sharp and if you were to view these at about quarter screen you might be able to really read the words. Yay! Original here:

old video here

18% Gray Card

One of the things I wish I had taken in college was a basic
photography course. My understanding is that the basics of photography
translate well to digital. My only purpose with a camera is to take nice shots
of my work. I’ve learned a lot about shooting pictures from various friends,
one of whom is a photographer. 3 years ago Eric taught me how to set up my
camera in “custom” mode, evaluate my white balance and to use mostly manual
settings and to use my timer settings. I’d been using a tripod for years and
had been getting decent shots but Eric’s help really took my product shots to
the next level.

Then I changed cameras and it all came crashing down. I
stepped up; my new Canon had about 12 different settings. I did everything that
Eric taught me with my old camera to the new but forgot about evaluating my
white balance. Not a huge deal. My photos were never the right color, except
for when we were in our old place- that place, you couldn’t get a bad shot, the
light was so perfect. (Seriously the studio had north facing windows, 2 of them
and was filled until sundown with gloriously bright light.) So moving into our
new place pretty much put out the death bell on my photos. I was editing,
highlighting, fill lighting etc. Each photo that had once taken me 2 seconds to
shoot and 2 seconds to crop now took 3 or 4 steps to get ready for the
internet.

Until I did some reading, I rediscovered the “evaluate white
balance” setting on my camera and everything popped into place. I found some
info online about an 18% gray Card. This is essentially a flat gray piece of
card or cloth that is 18% red, 18% green and 18% blue. What you do is set this
in front of where your subject will be, use the evaluate white balance setting
while focus in on only the card and like magic the camera sees the colors
pretty much right. It’s seriously amazing the difference this makes, in both
video and still shots. I bought a 8×10 card from a local photography store, but
these things are all over eBay and the internet. Mine cost $3.50. I cut an end
off and have one in my video camera and regular camera bag, the large piece
sits next to my photo set up. There are some videos on YouTube showing how to
use one. I’ll track one down and post a link. I also found numerous websites
discussing the gray card and it’s virtues as well as a few debunking it.*

Before getting the 18% card using the manual setting on my
camera for evaluate white balance also produced pretty good results. I used a
white index card, focused in on it and then used the EWB setting on the video
camera and colors popped and looked more true. I also tried it out with my
camera and same deal. The 18% gray card though, the results were startling and
pretty amazing.
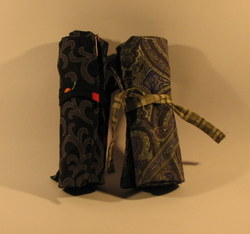
 

Img_5348

This photo was taken with my camera AWB or auto white balance. This is the Devil.
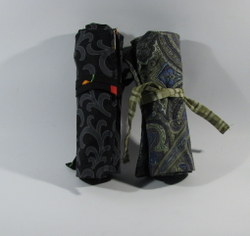
Img_5349

This photo was taken after focusing in on the white card and using the Manual White Balance setting. Markedly better. You can see in the fore ground how it’s a touch dark, but it’s nothing that that fill light in Picasa can’t fix.
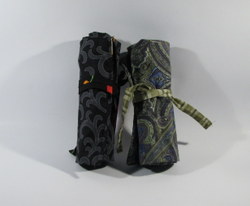
Img_5350

This is after using the set white balance setting while focusing in on the 18% gray card. Remarkably better and even significantly so over the white card. Still the white in the fore ground is a touch dark but the colors are all true.

I checked out the histograms of all the images in picasa and the difference on the graph is what you see in the pictures. Picture one is a mess, picture 2 is a ton better and picture 3 is very good indeed. I guess  that the next step for me is to get another light and clip it to my tripod as well as a few filters for the lamps so that the light is slightly defused rather than direct.

*I’m not going to go into much about the debunking it
theories, most of the articles that I found with a negative view of the 18%
card dealt with specific brands of camera and what specific amounts of RGB
their sensors could read. In my application a different between 18% and 14%
isn’t going to make a huge difference. Not to mention that most of the articles
dealt with Nikon cameras and since I shoot with a Cannon and a JVC it doesn’t
matter too much. I suggest that you google 18% gray card and see the hits you
get and read a few of the articles.
Chapbook from 1999

I made this book in collaboration with a friend of mine. It is pretty much the only book I’ve made in collaboration with anyone. It’s a pretty simple Japanese stab style binding. Done with black cotton crocheting thread. The stations were bored with a dremel. The fore edge of each page is the folded edge of the sheet of paper. at the time of printing I had a ancient bubble jet. I was working some place where once a week I had unfettered access to the photocopy machine… I made zines then too. I printed the text, took it to work, copied the pages onto my really nice paper took them home and printed by hand all the little block prints then collated and folded every book, clamped and drilled holes then stitched it all up. The whole process took a long long time. My friend and I were mailing back and forth a notebook with the images and text, until we had everything agreed upon, then I typed it all up and emailed it to my friend, she tweaked the text, then I made it fit onto the page.

I’ve got to say that this was a great project, I love how the final product came out. I think we made a total of 100 books. The cost was a lot though. I was really poor at the time of us making this as was my friend, I want to say that we spent about $50 getting this thing going and never made any money on it. I still have a stack of the books. I sold a few on eBay and my friend had the other half of them and I’ve still got a stack of them.

I still thing that they are really cool.


New CamCorder

After shooting several lame videos with the webcam,
researching it’s capabilities on the net as well as optimization AND
downloading the most recent drivers and software I was unable to get it to
operate at it’s advertised recording rate of 30fps. The best I ever got was 8.
AS a result I loaded up and made several crappy videos. The quality that I like
isn’t in those videos. I’m leaving them up on YouTube as a reminder of the learning
curve and because people have commented on them and I might as well. Out of
frustration and anger I took the webcam back, got the cash put onto a gift card
and went shopping for a camcorder that would A) record video B) offer easy
linking to my laptop and C) Grow with me as I upgrade my computer and other
equipment in the future. I had settled on a sweet little canon, but they were
out of stock.

So I spent a little more than the budget allowed and bought
a HDD JVC Everio. It’s super easy to use, has manual adjustments, and hooks up
to my laptop with ease making downloading my videos super easy. It came with
some editing software that’s pretty easy to use and so you can expect some new,
higher quality videos of my books and journals soon.

I have made the decision to reshoot all my old videos as
well. So all those barely clear videos I made in the past will be redone in new
sharp video. I also have the option of saving them in DVD quality and burning
them to DVD, which could be very cool.

So all you can expect over the next few weeks that I’ll be
loading up a few new videos. AS usual if you feel like linking to those videos
or loading them up to your blog feel free to do so!

A quick reminder: My etsy shop will be having a $2 shipping
sale
for the rest of 2007 and the month of January 2008. Shipping on items
$9.99 and up will be only $2. Multiple items will ship for only $2.
Unfortunately this applies only to shipping in the US only. International
buyers will have to contact me to get international shipping prices. Feel free
to post this info to your blog.


YouTube Journal

I found this on YouTube the other day the YouTuber Cordebra says this:

This is my illustrated diary with entries from 2004 and a few pages of 2005. The book is like a moleskine.

I say it looks like an honest life book or journal of some one’s life. Great little nugget.

MY first Hedgehog ever

This is the first hedgehog I ever made. It’s a 3.5×5.5 inch 100 page hardcovered book, with a long stitch binding. The elastic on it is completely gone- a strip of braiding with hard little lumps. The leather along the spine is from a recycled totally sweet 1970’s jacket I snagged at goodwill in Bangor Maine. IT had holes and it made great red brown books. Anyway Check it out


$2 Shipping Sale

For all my etsy buyers in the US I’m having a $2 shipping sale. Shipping on all items $9.99 and up is just $2, even when you buy multiple items. This applies only to buyers in the US, I can’t afford to ship worldwide for this price. International buyers will have to convo me for shipping.

Head on over to etsy, check out my books and buy with super low shipping.