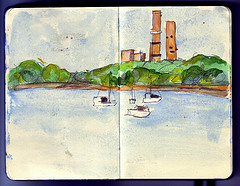
my finished art journal

I finished an art journal, yay. Usually my journals sit about 3/4’s of the way full and I don’t fill the last few pages. But I’m pretty proud of myself and feeling somewhat accomplished that I finished 2 in a row, cover to cover.

My goal with this most recent journal was to chronical my life in words and images. I think this journal does that. In most cases I have obliterated the words to make room for the imagery, but allowed some of the words to peeks through. I aimed to distill each days events down to a single spread in the journal. Every spread is a single days entry. Though I might say that I didn’t limit my activities on a spread to a single day, many of them I worked on for several days, and on weekends. Though the image may be about one single day or event I may have spent several days working on it.

Working 3×5 inches has challenges. I like to work small but some of my ideas I felt needed larger pages, alas I had a given size and I worked in it. I think it adds to some of the work that it’s forced to fit onto a small page, though on some pages I did allow myself to extend past the page borders.

The journal itself was a screw up, on I intended to sell on etsy but I fouled up the cover and made it about 1/8th inch too short, it made the journal disposable for me.It was in essence trash, so when I started to fill it’s pages I wasn’t nervous about screwing anything up. If anything now the short fore edge of the books adds to it’s charm, the fore edge of each page is exposed and make s the book look like it’s in a sweater that shrank. It looks far more abused than it ever was. I did take the book with me a few times but for the most part I left it at home on my easel, waiting for me to have a grand idea.

I worked in it heavily, thick impasto acrylics, layers of gesso and ink, sheets of paper glued in, pages from books, fold out pages, pockets and stuff glued to the pages, with acrylic and watersoluble crayons over the top of that. Each page was sealed with a 50/50 mix of bee’s wax and parafin. IT adds a nice glow tot eh pages and seals the acrylic from sticking to the other page. With out the wax, my journal would be one group of glued together pages.

Some photos:

Img_5510

Img_5515

Img_5518

Img_5527

Img_5542

Hump Day Prompt #5 “Craft” Acrylic

The prompt is open ended and deals only with the
material, subject and content are up to you, but the
material is dictated.

Next on the hit parade is acrylic. I love me some acrylic
paint. When you start art journaling your going to go to the craft store and
look at the seas of paint- 2 parted but like seas of artist grade VS craft
grade- what to do!!!!! Both are great for different reasons. Craft grade
acrylic has come a long way in the last 20 years. The bigger brands have added
some lightfastness and quality to their paints. IN terms of craft paint price
is directly linked to their quality. Most tubes are around $1. I like Delta
brand. Applebarrel comes in a lot of colors. Find a sale and spend $6. Pick up a
tube of red, yellow, blue, green, and orange. Buy darker colors- you can add
white later. These liquid paints are great for backgrounds and flat painting,
ie if you don’t want texture these are wonderful. They dry quickly and dry
matte or flat. They layer well and some people do fantastic stuff with them.
The great thing about them is that unlike artist quality paints they dry
completely and don’t stick to one another, so you can work on facing pages and
not worry about the pages sticking together.

Prompt #5- use craft grade paints to make a page.
 
Leave a comment with a link to your blog with pictures of what you’ve done!

(Note: In relation to last weeks HD Prompt craft grade acrylics are GREAT for toning pages. Try it you’ll like it.)

Sewing Cradles Available Again!!!

In other excellent news. I talked to my Father about the whole sewing cradle thing. My brother really dropped the ball on it. I love the kid and while he’s a bit of a genius in some areas he’s really not in other areas, one of them being customer satisfaction and service. I was told by a fellow bookbinder and BEST member that my brother never got back to her about a sewing cradle, while I was mortified and embarrassed my brother claimed he had gotten back to her. Though somehow I doubt it. So I chatted with my dad, told him about the issue and he said he’d set up shop and make 50 or so of them. The other deal will be that he’ll bring them to me when he comes to visit next, which should be in a month or so. After which I’ll have all the cradles here and I’ll be shipping them.

So starting now, sewing cradles are available again. He’s piecing the 50 together slowly but surely and I’ll have them in my grubby little hands next month. However my Father is much more reliable than my brother and can be trusted to ship them from his farm in Maine. So as of now he has one completely finished and ready to go, I’ll be listing it on etsy in the next few days and then as he makes more I’ll list them too. He’d like to have a few go up on eBay but I’m reluctant to do that. But we’ll see.

So yay for new well built solid pine cradles. I will post about this again as more become available!!!

Price will be $32.99+ $10 shipping (in the US

Hump Day Prompt #4 Toned Pages

The prompt is open ended and deals only with the
material, subject and content are up to you, but the
material is dictated.

White pages can be intimidating and boring. I like to randomly turn through my journal and "tone" a page with either watercolor or gouache. I try to stick with a nice even layer of color that doesn’t quite come to all the edges and is a little imperfect. If you like working in colored pencils this adds a fantastic layer of tooth to the page, allowing it to hold a lot of color. It’s also fantastic for pastels.

Prompt #4- Go through your journal with some
basic colors of gouache or watercolors, tone pages. Lay down a thin even coat of one color to
a page. Try yellow ochre (or yellow), red, blue and green. Let the pages dry over
night and then draw on them with a thin sharpie. Nice isn’t it. Gouache has
great tooth for drawing. Try drawing on it with pencil, colored pencil, and
pen. Now go back and add more colors. Mhhh nice isn’t it? You like that don’t
you?


Leave a comment with a link to your blog with pictures of what you’ve done!

(Note: this can also be done with acrylic but that limits what you can put on the page afterward to more acrylic, which is why my suggestion is to stick to watercolor or gouache for this- they way you can add to it with just about anything and even layer on acrylic later if you want.)

Thrifty Collage Artist

You need to check out this blog…. It’s awesome. There are a few entries about the process of how she sets up a page and it’s pretty neat to see the steps she takes to make a page. Very nice.

Tca1

Tca2

All images are property of the artist.