I am a firm believer in making book cloth the old-fashioned
traditional way: paste, thin paper and fabric. It’s been done for, well,
centuries and it works and it’s not too hard.
First you need a starch paste. I like wheat paste. It’s
cheap and easy to find. All you need is pastry flour or wheat starch and water.
Pastry or cake flour is available in any grocery store and wheat starch is
available in specialty stores. You can also buy “real” wheat paste. Mix a 1:4
ratio of flour to water. Mix it well, no lumps. Now cook it, whisk constantly
over medium low heat until it becomes glossy and translucent. This amount of
paste will make a lot of book cloth and paste paper. I would suggest using
distilled water it won’t have any funny chemicals in it that will discolor
later. If you are an acid free freak add a ½ tsp to baking soda to the water it
will neutralize any acid content.
Cut your fabric to the size you would like. Use pre-washed
and ironed fabric so that it doesn’t shrink when you are gluing it. Cut your
thin paper 1 inch larger all around than the fabric. I really like washi paper
best but student grade sumi painting paper is more than perfect.
Now you need to spread your glue. There are lots of
differing opinions about how to do this, some people like to use a rubber
spreader and other like glue brushes and others like cheap chip brushes or
gesso brushes. I’m a brush woman myself. I used to use a 2-inch wide chip
brush. It worked great, but now that I’m working with a smaller size of paper I
use a medium glue brush. I suggest you try a variety of styles and see what
works for you.
I hold my paper down with one hand in the center, spread
glue allover the edges- generously. And then start to work the center. Work the
glue around until the wrinkles relax out of the paper. With thin washi paper it
takes 20 seconds or so for this to happen, constantly move the brush and glue,
work fast and loose, spread the glue generously. Don’t skimp on the glue. When
you see the paper relax, start to move excess glue to the edge and off the
paper. You don’t want a ton of glue on there when you put the fabric on the paper;
you want a thin EVEN layer.
Now your paper is relaxed with a thin even layer, you need
to drop your fabric to the glue covered paper wrong side down into the glue.
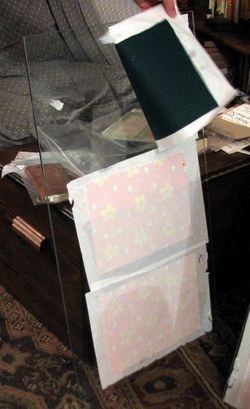
Gently rub the fabric into the glue. Now you need to pick the fabric, glue and
paper sandwich up and take it to a window and place the sandwich to the window,
fabric side to the glass, the extra glue covered paper will hold the paper and
fabric taught while it dries keeping it for the most part flat and keeping
tension on the fabric. (If you are lucky to have it- old window panes work
great for this- I was lucky that when I bought my house there were several large
pieces of plate glass in the garage.) AS it dries the paper will peel away from
the glass, if it doesn’t it cleans easily with soap and water.
There are many reasons to back your cloth with paper. First it
makes the fabric very easy to work with when binding, you fabric won’t stretch
when you glue it to you board. Secondly it keeps the color of the cloth true to
the fabric. Third, it decreases glue seepage. Fourth it makes a strong durable
bond of fabric to paper to board. There are several tutorials out there for
making book cloth with wonder under or other fusible interfacing. While it’s
fast and easy to use its more expensive and unknown in terms of it’s being
archival or acid free. (Let it be known here that I’m not an acid free freak.
There are books and paper out there that were made long before PH was
understood so my philosophy is that you can do what you want and most things
are going to outlive you and probably your children.
