Tag Archives: journal

Wordy Wednesday: Creative Commons; with attribution, non-commercial

In my world, copyright's purpose is to encourage the widest participation in culture that we can manage – that is, it should be a system that encourages the most diverse set of creators, creating the most diverse set of works, to reach the most diverse audiences as is practical.- cory doctorow

The above quote got me thinking about copyright, people stealing my designs, and the wide open world of the internet. Last weekend, most of you may have missed it, as I failed to announce it, I opened my entire flickr stream up to Creative Commons(CC), Attribution, non-Commercial. I had the setting previously to All Rights Reserved. I read this article with the above quote this AM, about a week after making the decision to go creative commons with my photos. I've also made the difficult decision to set my blog, back to the first entry on blogspot to the same creative commons as the flickr set.

This has been something I've been mulling over for months. I see the internet and thus my blog and photos as communication. I've always seen the important part of them is as a tool of communication. By setting my flickr to "all rights reserved" I forced people to ask permission before blogging one of my photos, or worse yet, forcing them to make the choice between asking permission and just not blogging one of my images. Over the last year I've seen how foolhardy that is, first hand.

Over the last year I've featured a lot of artists here on my blog from flickr. I've been forced into the same choice I've forced people into- ask permission or not blog. I'm ashamed to say, I've made the choice to NOT blog more times than I can count. I started out with the whole idea of the feature from flickr to showcase some of the work that makes my heart pitter patter, things that bring both enjoyment and inspiration into my life. When you go "all rights reserved" the viewer entranced with your image is forced to ask you permission to post your images. Flickr takes away the easy access. I'm forced to go from the awe and inspiration phase into thinking about business before I hit "post." Instead I hit "send flickr mail" and type up a quick email asking permission. More often than not I get no response. So after sending several hundred "Hey can I post your pic?" emails I quit.

I quit because a blogger asking an artist's permission to use their art- with attribution and a link back to the original image with a paragraph about WHY the blogger loved the image wasn't enough to get a response from most people. I have my flickr mail set up to send me an email. I can read the email and decide if I want to respond with a yes or no. I'm willing to bet from the utter lack of response I've gotten when I asked permission that most people don't have that set up. Or people just didn't care about getting their work posted on someone's blog.(Even with hundreds of readers a day!)

The real question is why would any artist want to shut down an avenue for more people to hear about and see their work? The more eyes on your work= the more potential sales. The more people talk= the more sales. To me allowing people to easily blog my images is a win-win situation. They write about my work and people see it= win. If someone wanted to use my images to illustrate a blog post, they can easily do that, all they need to do is link back to either my blog or the original image in flickr. Again, I see this as a winning situation.

Recently one of my favorite artists went from easy access sharing to no access. I was looking through her flickr stream and found a whole host of images I was considering posting with a week devoted to her work. When I went to set up the posts, I was shut down. I was no longer able to use the flickr "post to blog" option, nor was I able to use the "embed image" option. The artist had shut down all options to share her work with others. I was and remain baffled. This is an artist who has had several shows of her work and is well establish and until 3 weeks ago, allowed open sharing of her images, with attribution as long as there was attribution, which I had always given. I have to wonder why someone would do something like that.

On one of Hazel Dooney's recent FB updates I wrote that I felt people should have more access to artists and their work. CC is one way to do that.

Of course, there are always people who are going to steal your stuff. It's the nature of people, the internet, and commerce. Like it or not we're in a commercial business (like it or not art, writing, and images are commodities) and we have a choice- let people steal or take control of our commodities and sell to people what people steal from us. I, for one, am tired of people stealing my designs. So, I will continue to make and design my stuff but I'm going to open a lot of it up to the CC and see what happens. Make anything I create for yourself but start to sell and we'll see what happens. This isn't tricky legal territory. You can read all about the CC here and educate yourself in it, it's less complicated than you think. It also puts the screws to the people who would take your hard work and rip you off.

I tweeted that I was frustrated that people had essentially stolen my pen slip design and were offing the product at a premium price. I'll be honest it's frustrating to use my creativity and come up with an idea that is immediately ripped off. Eventually I gave up on making the pen slips I'd been handcrafting in my basement, individually with care and attention to each one. I gave up becuase I felt I couldn't compete. I see now exactly how misguided I was by giving up. People will always buy the original from the original. There lies my big mistake. Should I start up on production again, it won't seem like I'm the original, no I'll seem like a copy cat, though I've got images in my flickr pool dating to way back in 2006. Giving up was the worst idea I've ever had. I've been kicking myself about it every day.

When I realized that I was doing the exact same thing I hated on flickr, I knew I had something to fix. I looked through flickr and figured out how to make the change and made the best CC licensing choice for me. Should you want to use one of my images in a commercial manner, email me. We can talk, but if you want to feature me on your blog, that's easy, now! Use the flickr share option and share away!
Art Habit part 1

I’m making a commitment to write more. Partially so my writing gets better but also because I’m working on a book. I’ve mentioned Art Habit once or twice before but this is my first public commitment to making it work. InkyGirl.com has 3 challenges on her blog, one of them is a challenge to write 500 words a day. When I’m focused on writing I can easily churn out 1500 words in an evening. When I’m not focused I write nothing. Goal setting is supposed to be good for success so I’m setting a 500 words  a day goal. Will I keep it? Who knows. I hope so. I suspect it’ll be an easy goal as 500 words is just a few paragraphs and about a decent blog post.

I can never keep to NaNoWriMo as it’s the busiest month of the year in my retail job. I’ve signed up nearly every year and failed every year. This year was no exception. I started and I’ve got about 10 to 15,000 words of Art Habit written. I’ve got another 10,000 or so stewing in my head and in various manners in various journals and I’ve given myself a commitment that in 2011 I WILL finish Art Habit. It WILL go into publication in 2012. That is my commitment to myself. This is something I’ve been working on for years, it’s been stewing in the back of my mind since 1998. Every year I’ve given up on it, put it further and further to the back of my mind and told myself that it can’t, won’t, and shouldn’t happen.

This is the effing year I MAKE it happen. This is the year I’m taking a sabbatical from my DayJob, working on an art show, a book, my blog and all the stuff that is important to me.

So let me tell you a little bit about Art Habit. It’s about making and keeping an Art Habit, how I’ve managed the screw up my Art Habit over the years, how I’ve shot myself in the foot, repeatedly year after year, and how I finally found my niche, my place and the ability to keep my Art Habit alive and strong. It’s my story, with some questions in there for the journaler and artist. It’s an exploration and I’m inviting you along to see what has worked and what hasn’t worked. It’s poignant and heartfelt. I’m going to let it all hang out and see what happens. Honesty is good. Hopefully you’ll enjoy the story.

I plan on sharing excerpts as I write here on my blog, I invite you to share with me, in the comments, your thoughts, feelings and stories. I invite you to share with your friends my words via your blog. I want you to muse on my writing in your journal. This is a personal journey I’m sharing but I’m inviting you along.

I can tell 2011 is going to be a spectacular year.

Continue reading

Some more stuff for the upcoming year- Reviews

Part of what I want to add to this blog is a series of reviews. I’d like to review journals, products, books and other items one might use in journaling; both art and written.

I’m developing a format for reviewing journals and products associated with journaling. Obviously journals will have their paper reviewed in terms of suitability for wet/dry media as well as how that paper holds up to the abuse of mixed media. I think that a good art journal needs to also have pages that can be written on with a variety of tools- sharpies, fountain pens, pencils and other markers. I’ll address such things as strike through, bleed through and warping. Obviously this sort of journal review will be vastly different from how paper reviews are done on blogs that focus solely on one aspect of journaling. I have passed over paper that people adore on other sites and adored paper that some people despise.

So I invite people to contact me if they’d like to have their journals and sketchbooks reviewed. Each review will be linked to the seller’s site with plenty of contact info.

I’ve got a ton of products that I used and, sadly some I don’t use. I’m going to reach into my tool kit and evaluate some of these products. The perspective will be that of a mixed media artist. Can I layer the product? Does it stand up to uses the manufacturer suggests and doesn’t suggest? Is it useful? Is the price acceptable or outrageous? 

I’ve got a deep bookcase and I’m going to pull some of the stuff off the shelf, not just new books but older books and review them. I’ve been doing this in part for the zine, but I’ve focused on new books. I want to help people build up a book shelf of their own with books that are really useful resources for art journalers.

The reviews will start in January/ February and I’ll be hopefully be able to do one each week.

My hope is to make this blog more of a resource than it already is.

Anyone who is interested in having their product reviewed can email me: leslie(dot)herger(at)gmail(dot)com

Washi Tape reviews

I have a particular artist’s book/ art journal project in mind. My design idea includes a very specific color of washi tape- white. I initially wanted masking tape colored but I think the white is a better fit for my idea. The secondary part of the project includes green graph style tape. Anyway, this led me down the path of washi addiction.

I always test my ideas before spending a lot of time and money on them. I headed to Michael’s with my 40% off coupon in hand to buy some washi tape. The only variety they had was the Tim Holtz line called symphony. At $8 for 2 rolls I was appalled at the price but figured with my coupon it was only $4. I brought it home and began to test my idea and also do a little art journaling. I was instantly disappointed. The tape didn’t stick to my heavily applied layers of acrylic paint. It also didn’t stick to itself well. I liked the look of the page but ended up having to use double sided tape to get it to stick to my page and itself.

Being a mixed media artist I work heavily in acrylic paint in my journal. Many layers of it some heavily applied. I glue shit to my page and torture it into submission. I often refer to my pages as having been muscled into what I want them to do. So I need a tape that STICKS to acrylic, ink, watercolor, collage as well as raw paper. I get really angry with companies that label their products as MIXED media and it clearly doesn’t work with one of the media. This is not Tim Holtz’s fault. He doesn’t work in crazy layers of acrylic paint like I do, he works in thin layers. I’m sure the tape will stick to dauber applied craft acrylic. I need tape that sticks to artist grade acrylic and gel mediums.

I tweeted my disappointment. (Not one word from Ranger btw…) I got a ton of response from other art journalers- try this brand try that brand, I have good luck with x brand. Though sad I placed a couple of orders on Etsy for 2 different brands of Japanese Washi tapes. One I ordered through Washimatta and another through PrettyTape. Both arrived promptly and very cutely packaged.

The PrettyTape package of the gridded tape arrived first. So cutely packaged! I tore off a piece and found it was VERY sticky. The tape felt stronger than the Ranger tape as well. I stuck it to the first heavily acrylic covered page in my journal and it stuck, no peeling of the corners, no lifting just strong sticking to the page. I also peeled the tape off the packaging and used it to stick a penny to the page, it stuck well, though I had peeled it off a glassine envelope. I poured glaze medium over the top of it and let it dry. No color lifting, no curling of the edges and again just sticking. PrettyTape washi tape has a vote of confidence from me. The tape sticks everywhere and doesn’t peel up.

I decided to take part in a little retail therapy in the clearance section at AC Moore after a rough week at work. I shockingly happened up $3 packages of 7 Gypsies colored masking tapes. These are more like American Masking tape than the washi tape but were super cool. At $3 a roll I could not pass them up. I grabbed a package each of the available colors. Spending $6 for a total of 6 colors was a steam. These are a peel and stick tape with a backing. The colors are grungy and rough, the way I like them. I used them to stick a medication package to my journal page. They stick, with no lifting or peeling. I used them again on another page and added a glaze of color over the top and I noticed some peeling but I didn’t burnish them down well on that page. The verdict: For clearance steals the 7 Gypsies tape was awesome. I suspect that it was what we call in the industry a “miss-pick*” as I’ve never seen any other 7 Gypsies product in that location.

The Washimatta tape arrived last, as it came the whole way from Japan. Again super cute packaging, opening these tapes was like opening a gift. I love it. The perfect white tape is perfect for my project. She also included a super thin roll of bright blue tape. It’s very cool. I pulled a piece off the roll and could feel that it had strong sticking power immediately. I stuck it to the same page as the other tapes and again burnished it with my fingers, it stuck, strongly and cleanly. I peeled up one corner and stuck it back down, perfect sticking. I’ve not added a wash of color to the tape as I’m not planning on using it in that manner. But in a typical art journal application of sticking to acrylic paint, it sticks and well. Washimatta tapes get a double thumbs up. I can recommend them.

I’ve got to tell you, like anything that comes in patterns and colors you can get really addicted to washi tape. It’s super cool, adds a perfect line of color to an art journal page and is fast. I’m looking at those solidly colored pieces of tape I bought and imagining them with rubber stamped patterns, sharpie drawings and other embellishments. No need to buy all the funky patterns, or even that many colors. Buy a few rolls of plain colors and ADD to them the patterns you want or a glaze to alter the colors. I’ve seen a whole host of great tips and hints on how to do this online. I’ll get my rubber stamps out for UStream one of these days. I wouldn't have bought it except for my project but I'm glad I've gotten to play around with it.

Continue reading

Traveling with your Art Journal: 2 Videos

I've been working on my travel journal for my upcoming (no fun) trip to Maine. I'll be up there for almost 2 weeks. I don't usually take my acrylic paints with me and I know that I'm not going to have the time I often have to work on the pages with watercolors. I like to work on colored pages so I've gone through and I've collaged into the journal random images from Mother Earth News, Wine Enthusiast and some collage papers. I've gesso'd the pages then used thin acrylics to color each page. After that Iused watered down acrylics in 3 colors to tone down and grunge up the pages. I'll be doing a whole video on that soon.

Anyway, here are the videos!

When I finish filling this journal I'll be doing an art journal flip video. I may try to do some process videos too. I'll have my cameras with me when I'm traveling, so we'll see.

Moleskine Give Away Contest

About a month ago I was contacted by Chronicle Books about hosting a give away on my blog of products from the new Moleskine line of products. Unable to say NO to anything free, I accepted. I expected a small amount of products, one or 2 sets of books. Instead I received, via Fedex, a large box. In it were several colors and sets of the 5×8 Volants, a set of the pocket sized volants, a desk calendar and the hottest thing in there, several Color A Month Planners.

Continue reading

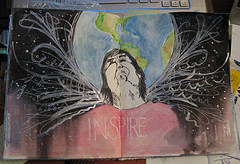
nanojoumo #3- inspire


nanojoumo- inspire
Originally uploaded by lessherger

I had to think to myself what inspires me, then I had to think what doesn't? This is my way of thinking about that.

I sketched out the globe behind the figure first and then sketched in the image of the face, uplifted and with a smile. The next time I decide I want to draw a face on the fold punch me in the throat.

I used my ink brush (fine koi water brush filled with india ink) and inked in the face, body and around the world. I used watercolors to add color to the world and deliberately left the face black and white. I colored in the "shirt area" with watercolor pencil. Using a brush I filled in the black background with india ink and a brush. I spritzed the shirt area with water to allow the ink to run down it.

I hit all that with my drier and dried it out. I then used my gelly roll pen to add some fine line doodles and swirls. I used a brush with liquatex silver ink to add more depth and then added some white acrylic to add more swirls and doodles.

You can't see how awesome and neato the silver ink is in the pictures. Also the curve in the face distorts the face more than it is in reality and makes the whole thing look kinda weird in the photo. I'm not overly happy with it as a finished piece, but I tried to make this a little less complex than the last few images I did.

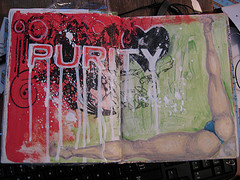
nanojoumo- purity


nanojoumo- purity
Originally uploaded by lessherger

I get a kick out of all the online "purity" groups. SO when the word purity came up for nanojoumo day 2 I had to lampoon it. The purity "logo" was put online as a purity card for a church group. It looks far cooler here than it did on the card. I pulled the card in to MS Publisher, reversed it and resized it to be about 8×10, i then printed it off onto a sheet of transparency film. I put it on the right side of the film this time and used a great deal of matte medium to transfer it to the pages.I had to cut it into 2 pieces to get it on, and I'll tell you the fold was a beast. the original logo was clearly going for a "urban and graph" feel. So the tendency of the transfer was a perfect medium to really take it there. I then outlined the letters with my pentouch pen, pressed down to get dribbles and runs. While that dried I looked at hundreds of images of scantily clad women bent over various objects, and quite frankly there are things that can't be unseen. Just the very act of attempting to find the image for the right corner has left my brain irreparably damaged. The things I do for art. I found the perfect picture, of a woman, scantily clad washing a car. I wanted the legs to frame the corner, so I first drew the leg for the right most side in soft pencil, added the crotch area and then the left leg. Next was to mix up some white person flesh tone and layer it over the drawing. I added her thong and it's all set. I blocked in some green coloring to set off the legs. Then I mixed up some gesso really thin and used a liner brush to spatter it on the page…

Maybe not the most pure purity page, but it's exactly what popped into my head when I first saw the word as the prompt.

art journaling progress and an update.

Its been a quiet but beautiful couple of days here. Warm and windy perfect Halloween weather. Also great art journaling weather. I had hoped to get out yesterday and draw at the park or beach but it ended up being far too windy for that. Instead I sat at home and made 2 technique videos and a possible video for materials. I thin that the art journal materials video would be better as a page on this blog than a video.

The second new video isup on youtube and I'll put it at the end of this entry behind a cut for faster loading. I'm still getting used to the camera but so far so good.  It can only get better from here.

If you haven't heard about the storm taking over the art/ visual journaling world here it is NaNoJouMo! Head on over to d'Blogola to get more info and the daily one word prompts. The idea is to work in your art journal everyday, which is a goal I can get behind. You don't have to finish a page every day just put something into your journal everyday. I'm not sure I'll be able to do it everyday, considering what is going on for me from the 18th to the 30th of November. I 'll be in Maine then while my Mom has open heart surgery and then I'll be getting her settled back home and cooking Thanksgiving dinner. The surgery has already made its way into my journal in the form of lots of anatomical hearts and rib cages.

Over the next week I'm going to be shooting videos for the rules of art journaling- I've posted about them here before, so we'll see how that translates to the tiny screen.

I've been working on some transfer techniques in my journal. Years ago when I was working for a crazy company that had taken over a building that had previously housed a rug store and previous to that an audio visual sales warehouse we founds several boxes of inkjet transparency film.* I should have snagged it all but convinced myself I shouldn't DOH! Sadly I've only got 50 sheets left but oh what a blast it's been. First thing I learned- print on the right side of the film. If I accidentally print on the wrong side of the film the images are a total bitch to get off the plastic sheet. Oh and let me tell  you how awful it is. I'm surprised the neighbors didn't call the cops due to my cursing. I prevailed and I have several nice transfers in my journal. The other thing I learned? Don't use too much matte medium. Yup. Need to find just the right amount. Liberal spreading of the medium and moderate bone folder pressure and not allowing it to dry completely is best. I may do a video on it. It could be a fun thing to try with my own drawings as well as the fun anatomical clip art I found on line here. It says it's for educational use, but I recognize many of the images from a giant clip art book I bought in college that was copyright free.

Continue reading