Let’s talk about leather, black leather, distressed bomber
jack brown leather and baby bottom smooth deer hide. Well there’s not much to talk about really, other than it makes
some very sturdy notebooks, sketchbooks and journals that will survive time and
maybe even some serious abuse.
For awhile now I’ve spent a lot of time making recycled
journals and simple hedgehogs with wrap around covers there’s nothing wrong
with that as it keeps me making books but what I love to make are notebooks and
journals like these below:
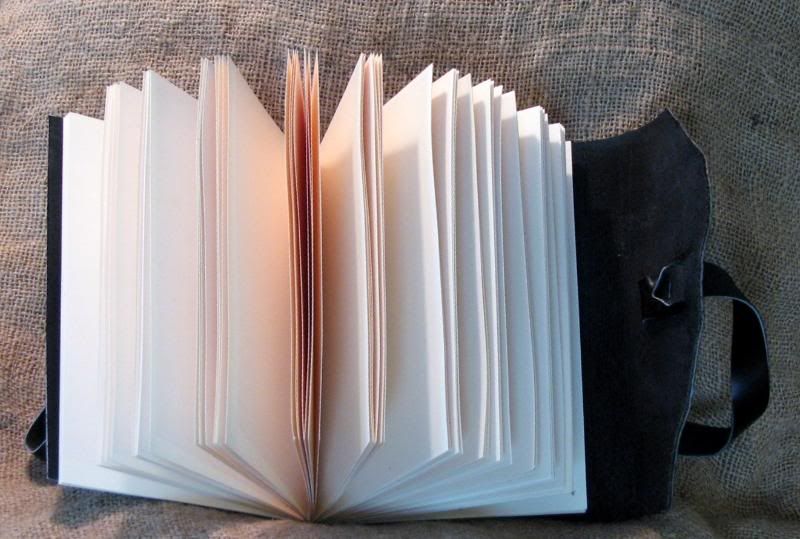
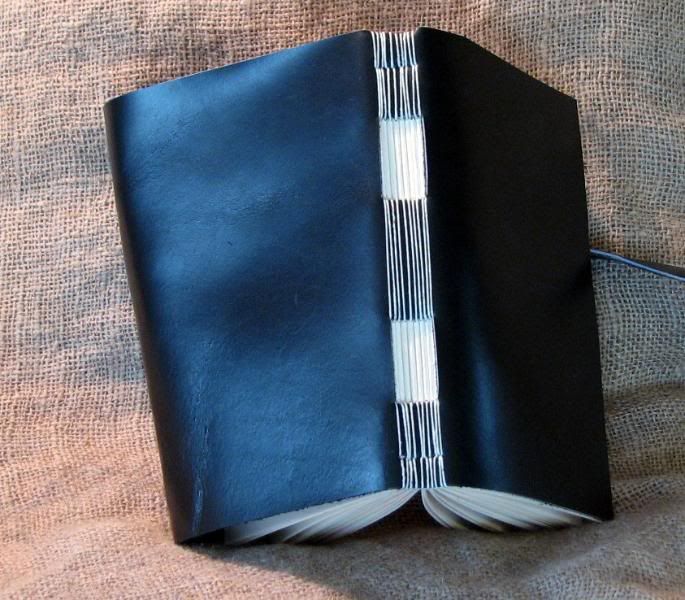
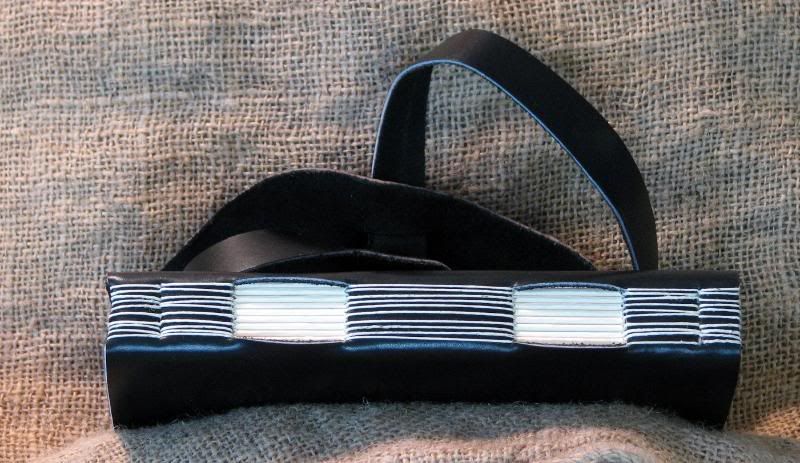
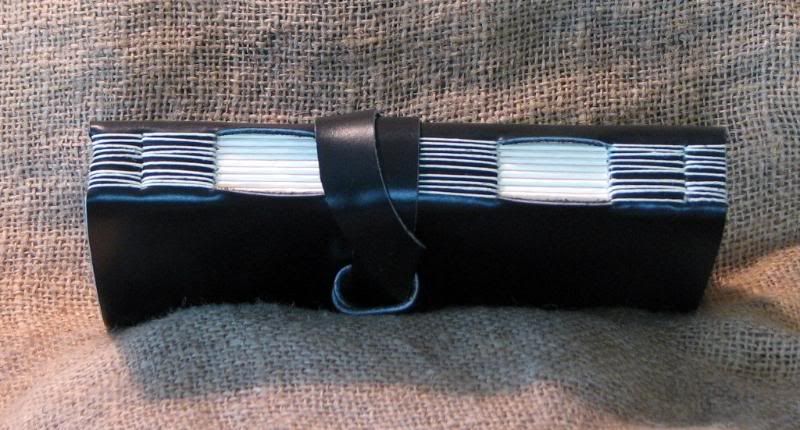
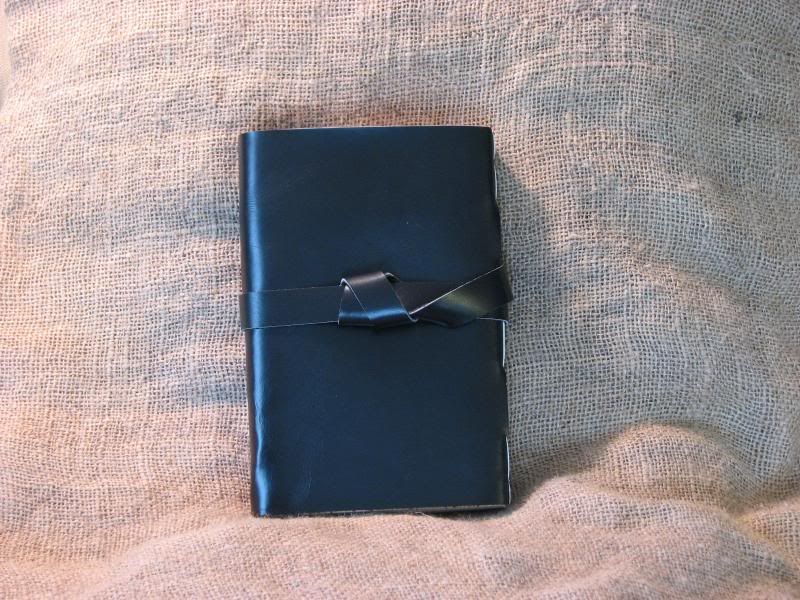
The really beauty of a journal like this is that because of the style of its binding it can expand to hold a whole lot of stuff- odds and ends, paint, and emphemeria. The card stock pages are made to withstand abuse and hold all the stuff someone might choose to glue on those pages. Even stuffe3d the strap and flap will wrap around the journal and hold it shut.
160 cardstock pages (110lb) wrapped in heavy smooth black cowhide, flap and strap closure, long stitch sewing style so that it expands to hold anything, It will be on eBay starting tomorrow with a low buy it now price as well as an auction option.
I made a few covers book board and paper from my stash of decorative papers. I made them to specifically cover hedgehog book blocks. So each cover is 3.5×5.5 inches and the spine is .75 inches thick.
To go with these covers I made some paper covered hemp cored headbands. These are glue on style and you probably can’t see them in the pictures, but they are there. I used dark red/burgundy colored washi paper. I used it because it’s thin, glues easily and I knew would wrap around the hemp cord with ease. I also knew that once it was glued up it would become stiffer than it was before and even with that the washi would absorb glue easily as I stuck it to spines. I’ve seen several other methods of making end/head bands before with fabric, paper and one I particularly liked was one that uses ribbon.
I’m listing one of these to etsy, one to ebay and keeping one.
I’ve added a new page tot he left of my main page. I’ve copied the text and images into this post so you can see it. I’ll update it periodically when I come upon some new websites with tutorials. If you have any suggestions leave a comment below.
So you think you want to start your way into this fantastic hobby of bookbinding? HEre area few tutorials, and beware binding can be addictive… like crack…
Coptic Style Tutorials: CHeck out this Youtube video:
There is no sound so don’t worry!One of the things that makes that video so great is that he’s showing a single needle tutorial with the covers attachedi n the correct way. See how his cover and spine edge of the signatures are even- the covers don’t overhang the spine? Yup, that’s how they should be. It shows a few good things- tensions are correct and the cover is attached properly.
This little gem of a tutorial is written from the stand point of a teacher as a classroom aid. (I remember those days, wish I’d had time to teach my students how to make a coptic book.) This is also for a single needle coptic book. (Image above is from the website.)
This tutorial is also for a single needle chain stitch. This tutorial features some great clear images of the sewing process. However, I disagree with the author in the section written on threads. The weight of the thread comes into play not because of "knotting between signatures" but because the thread lies in the fold of each signature. The thicker the thread the larger the stack of thread and paper along your spine, which causes the distinctive "coptic" spine flair that makes coptic bound journals so great for collage work. If you have knotting between your signatures you have other issues…. That being said this tutorial is one of the better out there. (Image above is property of the article author.)
This is not a true caterpillar stitch but it’s like a mini version. It’s from Evil Rooster, a website I love for it’s name not to mention that the site owner makes some great books. One of the many things that I really lie that is done on evil rooster is the use of stitching cards to learn new techniques. I have half stitched books, Evil rooster has card. I like the cards because you wouldn’t be tempted to sell s technique card like you might be tempted to sell a really col experimental technique journal…. Not that I’ve done that or anything….(Image belongs to Evil Rooster)
The binding above is what Cailun calls a tacket binding. Keith Smith refers to it as a coiled line in 1,2 &3 Signature Bindings. Never mind what it’s called take a look at CaiLun’s photos and make one. Hot stuff!
I really enjoy the images and art in the following blog. Arielle’s art blog highlights pages from her art journal. Interestingly she uses a lot of different media in the journal. I particularly like the pages that use an interesting background with a few simple visual elements on top, like the 2 examples below.
For those of you out there who are fans of making your own books you might want to check out The Bonefolder. It’s a quarterly scholarly look at the art of making books. Most times it’s a great read. In the back there are a few advertisements for supplies!
This week I finished 5 more journals. 4 are going up to my etsy account and one is going to eBay. All are smythe sewn- the style of moleskines. So I start with the book block, stitch it, then glue it and clamp it. Then that book block is glued into a cover.
For these I decided to make covers with flaps and straps instead of elastics. I thought it would be a nice deviation from what I’ve been doing. I’m particularly fond of the distressed brown leather. I like to call the color Choco-Latte, because it’s the color of coffee or milk chocolate.
The 4 below are the books on etsy. They are on there for $24.99 plus shipping via priority mail.
Lines and color, color and lines; if that’s something you like check out Ester Wilson’s blog. I’m in love with her sketchbooks. You can read her blog and then head over to her website and check out her sketchbooks on a page where you can flip through the books pages. Incredible. These 2 images are only examples of the artists work, she’s got a lot more at her blog where you can see her use of color and line.
In a discussion on the HedgehogsForever list the topic of awls came up. I’ve got several, all work different purposes for me, but the basic is to put holes in stuff. One I use for cardstock pages, another for softer paper, and another still for the custom journals. I made my first awl, bought another and made another; then had my brother design and make a hand turned awl for me.
I love the one my brother made for me, hate the one I bought and use the 2 I made regularly.
Some awl tips-
Keep them clean. It might seem kind of anal retentive but a more useful suggestion I can’t make. I use my awls for lots of stuff- piercing paper, picking up junk off my table, and lifting bits of glue covered paper. Wipe clean with a damp cloth and any cleaner you like. Allow to air dry before storing. Wet and damp metal will rust.
Keep them sharp. There is nothing worse than a dull awl. Seriously, have you ever tried to pierce through paper with an awl that is dull? UGH! I bought a super fine grit diamond stone at HD to sharpen my awls. I grind all my awls to an easily sharpened 45 degree angle, just like a chisel or a knife but you can also sharpen the awl in a rotating motion and keep a more typical needle point. That’s a lot harder than a 45 degree angle. Remember a dull tool is a dangerous tool. (That’s what my Dad always told us… And it’s a mantra I’ve found true- I’ve got scars to prove it.)
Polish them. Okay so I thought keeping them clean was going to top the list of anal retentivity. This does. Why polish? It allows the metal to glide through the paper with ease. It reduces the drag from the paper against the metal making it easier to push through a large and thicker stack. To polish you can do as I do and buy a polishing kit for a dremel or by hand. I’ll start with the dremel. Use the fabric wheel and add a little of the red fine compound. Turn the dremel onto a medium speed. Put the length of the awl needle against the spinning wheel with the point in the direction of the spin- DO NOT go in the opposite direction. I tell you this because I like my eyes and I’m sure you like yours too. Turn the awl in your hand. You’ll see a little gray begin to appear in the red compound. This step only takes a few seconds. Switch over to a felt tip. I prefer the small wheels but a bullet tip will work too. Here you can switch over to a white or super fine compound OR you can just put a little bees wax onto the tip. I run this until I see no more gray coming off into the felt. It takes only a few seconds. After doing this the needle will shine like a mirror.
You can polish buy hand with a commercial polishing compound and felt. Or you can polish with a little beeswax and baking soda. You need a little grit to get the polish going. Rub some bees wax onto a piece of felt or soft cloth, sprinkle a small amount of baking soda onto the cloth. Hold the cloth between thumb and forefinger and fold it over the business end of the awl and rub. It takes a little long and it will shine like a slightly older mirror, but it gets the job done.
I’ve found the combination of these 3 things make my awls cut through stacks of paper like butter. In short you can go through pushing through 20 sheets of paper to 40.
Here’s another blog that subscribes to my favorite sketchbook style- pencil, ink then color. I particularly love the image below of the yoga poses with the ghostly pencil sketches in the background. I love the lively lines of the pencils sketches and yet how simple they are. Following that is a sketch of a coffee maker… It’s a great layout of a page, well designed and a small blurb for journaling. I like it a lot!