Tag Archives: bookbinding

100% Recycled

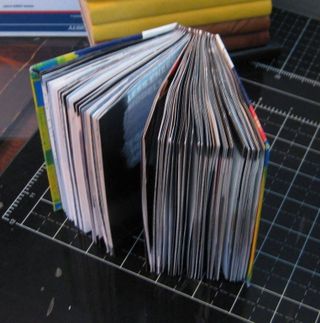
I've been working on this idea of some 100% recycled sketchbooks. I've been fascinated for some time with the idea of gesso'd  pages made of newspaper or magazines. I first experimented with this idea back in 1999, I gesso'd a hundred or so pages of newspaper and drew on them. I have no idea where those pages went or what ever happened to them. All I know is that I love to draw on gesso, especially when it's on top of chunky paper. The rougher the paper the more i like it. So why would I want to experiment with gesso on magazine apges? Color and pattern. It takes away the fear of the precious white page, the empty the making of the first mark.

IMG_0837

IMG_0838

IMG_0839

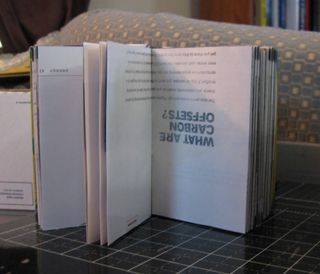
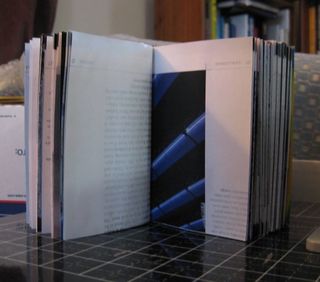
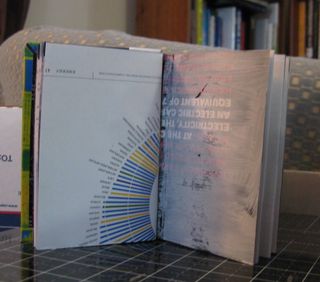
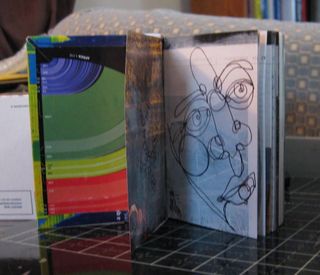
The first mark is there just whited out with gesso. I used a thin layer of gesso to cover up the words and images from a national geographic special magazine. I snagged 3 copies from the trash, chopped and stitched it up into a 3.5×5 inch book that is just a hair over 1 inch thick. The binding is a standard button hole style binding. I fouled up the spine a tad, but the spine is made of a recyled tyvek envelope that I had recieved somethign in. The book is about 98% recycled. The book board inside is not recycled and the thread is of course new material, but the rest all recycled.

IMG_0834

IMG_0842

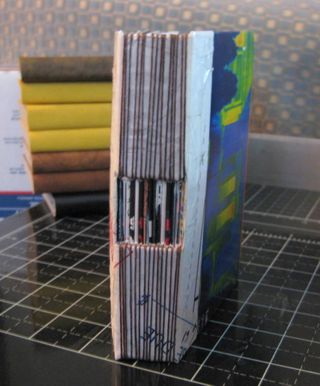
I digress. I went through the book with brush and  gesso and put a thin layer of gesso over images and words. I lightened pages that were too dark to write on. My first intent was to draw in this book with a ultr fine point sharpie or pigma pen. The pages are so slick that thegesso adhere'd well but will still scratch off, which leads to more ideas but wasn't what I had planned on. My initial goal was to use this as a sketchbook and journal. Sketching is easier in this book than writing. Mainly due to that issue witht he gesso scratching off.

I intended for this to be somethign of a prototype of sorts. I wanted to do a limited edition with pre-gessoed pages BUT it took so long to gesso up the 300 pages (all day) that I'd have to charge an exhorbitant amount to sell these and recoup any profits. Anyway, I'm in love with the size and chunkiness of the book and I've been using it a little bit here and there. I am going to make a few one of a kind versions of the book. BUt be aware you'll see some more sketches on here than you have in the past.

IMG_0836

Back on track

The weather here is miserable and has
been on and off since the middle of December. As a non-essential
member of staff I am often able to work my schedule around the
weather and today is one of those days. Thank god, the idea of
driving anywhere in this garbage is pretty bad.

My father has been hard at work on the
sewing cradles on the farm in Maine. He has a bunch finished and you
can find them in the supply section of my shop. Each fits perfectly
into a USPS Priority Mail Shoes box. They now fit a 12inch high sheet
of paper and he has rounded the bottom edge for a smoother look. He's
kept the basic design and simplicity of the item. They still come in
a simple linseed oil finish, rubbed on. The linseed oil finish is
used instead of a slick hard finish so that paper will not slide
around on the wood but he natural grain and texture of the wood will
hold signatures in place while they are being punched.

I've also made a ton of matchbook
notebooks. They are 99% recycled, all the paper and covers are
recycled but the staples are a virgin material. (Many staples are
made of recycled steel but I am not sure about the heavy duty staples
I'm using.) I've switched to a 6 pack for $5.99 and will give
discounts for bulk purchases. You can find them in the recycled
section of my shop
. Say I love you AND the environment by getting
someone special some recycled journal for valentines day!

Book Review Monday: Book Binding for Book Artists: Keith Smith and Fred Johnson

 This is Keith Smith's first book on book binding and a great one. All the styles he lists in this book require no specialized tools or equipment and can be made by anyone with patience and determination to create books. While this book was not my first on binding it is one to which I return to for clarification when I have a question. These styles of binding are those that once you learn them you'll be able to make them again and again without referring to the book or diagram.

The entire first section is devoted to paper and tools. It's an excellent introduction to basic bookbinding tools. In this section Smith gives the most detailed and best description and instructions on pasting I've ever read. The instruction starts with simple pamphlet sewn books and moves its way up to more complex styles.

This is an introductory book but it is an excellent reference book for those of us who have been binding for years. It's not the easiest starter book out there, but if like me, you tend toward liking clear excellent diagrams and detailed descriptions this is a good book to start with. I would also recommend it if you are simply looking for a good reference on binding or are looking for a great introduction to pasting your own book cloth.

I give this book 5/5 binder needles and 2 paint covered thumbs up.

You can find most of Keith Smith's books on binding at his website www.KeithSmithBooks.com

coptic bindings a bunch of styles and a cautionary tale of DayQuill and Movie Marathons

On Tuesday I found a few old posters at work, I asked the
representatives about them, if they were to be used again all said no and that
I could have them. I knew that at least one of the posters was at least 3 years
old, the other at least 3 seasons old. I knew in advance that they wouldn’t be
used again. Bringing them home I tried to figure out what I was going to do
with them. I knew that I wouldn’t be able to glue to them- one was a thin sheet
of plastic and the other typical vinyl coated ad glued to thin foam core.
Neither of which would take glue well, I knew it was going to have to have
Coptic stitching to use these posters.

SO I cut them all up, somewhat randomly to 3.5×5.5 inches
and then punched a series of 4 holes in each cover. I also matched up the
covers with some recycled backer board (very much like book board) that I had
saved from packages of tags also from work.

I expected that I wouldn’t have a chance to work on any of
these books until Friday, when I was to have my 2 days off. Instead I caught my
significant other’s cold and I have been sick and I’m still ill. It’s one of
those head colds where concentration is difficult and “stuff” comes from
sinuses. Let us not talk about that. Let’s talk of pleasant things like Coptic
stitching.

It’s been awhile since I’ve done any style of Coptic stitch,
other than long stitch. I’ve been quite caught up in this recycled thing. So
I’m out of practice and on the first 2 books I made, it shows. The first one I
made was a standard 2-needle sewing done twice. The first set of stitching went
well and looked great. I started the second set and it went well until the last
signature. Where I forgot myself (James Bond Double OH Days of Christmas on
Spike- my favorite cold weather TV marathon) and pulled in the wrong directions
with too much tension. The combination of DayQuill and James Bond made me want
to find a bad guy to toss it at to distract while I got away… (Only partially
kidding, DayQuill does make me a little loopy.) I patched it up and cursed the
fact that I had tied off the other set of stitches already, because if I hadn’t
I would have been able to simply remove the bad signature and attach the cover.
Ah well. See some pictures of my mistakes below.

Img_5243

The next mistake I made was when I decided to attempt a
particularly difficult Keith Smith stitching where you attach the covers to
each other first and then stitch on as if you are sewing onto cords. Instead of
attempting this sewing with a single cord I attempted it with a double cord and
a pack. Here again I blame the DayQuill for giving me a sense of ability far
beyond my 2 year lay off from a stitch. It’s far better to practice a stitch a
few times before attempting it on a cover you like. It’s also better to
practice on easier stitched before attempting something so… Difficult. (Before
anyone leaves a message scoffing at the difficulty of said stitch I implore you
to go take a dose of DayQuill, fill your nose with mucus, smack your head with
a hammer and get back to me after attempting any stitching.) Again check out
the picture below. I realize now looking at the picture that though I wanted to
do a loop and pack I didn’t pack as I had intended. Go figure.

Img_5242

The next 4 books were very successful 2 single needle
coptics, one with a larkspur and braided linen book marker, one double needle
stitch twice on the spine and a particularly interesting spine with black
leather “split tapes” with a stitch and pack on them. The leather is then
stitched onto the cover. For all the work that book was it’s my favorite. I
love the binding and it just looks great. The red on black is a great
combination and the dense heavy stitching is fantastic as well.

Img_5241


Img_5250

I fell in love with the book with the coffee cup and coffee
beans. I managed to punch the holes on it upside down but still I love the
cover and I’m keeping that one for me, a little feel better soon gift to
myself.

Img_5278

Each is filled with 200 pages of Wausau opaque in ivory,
unlined, acid free paper. I cannot vouch for the archival or acid free nature
of the covers. I did test the backer board and it is lightly acidic. The
stitching is all done with hand waxed Irish linen thread, unbleached but dyed.
The 3 books without imperfects will be up on etsy later today and I’m deciding
what to do with the 2 books with imperfections. I’m considering putting them up
on eBay as a set. Or maybe something fun.

The Giant

Take a look at this book. It measures 9×12 inches and has 192 pages. The paper is 60lb drawing paper and will handle just about any media. The cover is stiff smooth black cowhide. Features a flap and strap closure. The binding is a  longstitch with linking and a keyhole cut into the spine. I have a lot more pics on my flickr page. This one is sold (custom order) but I’m working on another in golden yellow deer hide.

Img_5015

Img_5010

mini sewing cradle- really mini

Sometimes when working in the miniature sizes you can use your full
size tools and sometimes they just don’t work, case in point-my sewing
cradle, when I Was making the mini books in the previous post the
signatures slid through the slot in the cradle, so I needed
something…. smaller. So I made a mini cradle. It measures about 1.5
inches long, and each side is that size. It’s about 2 inches or so high
and surprisingly sturdy. It’s surprisingly stiff and rigid. I’ll be
making a small sized awl to go with the set and make punching the
stations easier.

Img_4998


Img_5000

Img_5002


Img_5001


Book Cloth

I am a firm believer in making book cloth the old-fashioned
traditional way: paste, thin paper and fabric. It’s been done for, well,
centuries and it works and it’s not too hard.

First you need a starch paste. I like wheat paste. It’s
cheap and easy to find. All you need is pastry flour or wheat starch and water.
Pastry or cake flour is available in any grocery store and wheat starch is
available in specialty stores. You can also buy “real” wheat paste. Mix a 1:4
ratio of flour to water. Mix it well, no lumps. Now cook it, whisk constantly
over medium low heat until it becomes glossy and translucent. This amount of
paste will make a lot of book cloth and paste paper. I would suggest using
distilled water it won’t have any funny chemicals in it that will discolor
later. If you are an acid free freak add a ½ tsp to baking soda to the water it
will neutralize any acid content.

Cut your fabric to the size you would like. Use pre-washed
and ironed fabric so that it doesn’t shrink when you are gluing it. Cut your
thin paper 1 inch larger all around than the fabric. I really like washi paper
best but student grade sumi painting paper is more than perfect.

Now you need to spread your glue. There are lots of
differing opinions about how to do this, some people like to use a rubber
spreader and other like glue brushes and others like cheap chip brushes or
gesso brushes. I’m a brush woman myself. I used to use a 2-inch wide chip
brush. It worked great, but now that I’m working with a smaller size of paper I
use a medium glue brush. I suggest you try a variety of styles and see what
works for you.

I hold my paper down with one hand in the center, spread
glue allover the edges- generously. And then start to work the center. Work the
glue around until the wrinkles relax out of the paper. With thin washi paper it
takes 20 seconds or so for this to happen, constantly move the brush and glue,
work fast and loose, spread the glue generously. Don’t skimp on the glue. When
you see the paper relax, start to move excess glue to the edge and off the
paper. You don’t want a ton of glue on there when you put the fabric on the paper;
you want a thin EVEN layer.

Now your paper is relaxed with a thin even layer, you need
to drop your fabric to the glue covered paper wrong side down into the glue.
Gently rub the fabric into the glue. Now you need to pick the fabric, glue and
paper sandwich up and take it to a window and place the sandwich to the window,
fabric side to the glass, the extra glue covered paper will hold the paper and
fabric taught while it dries keeping it for the most part flat and keeping
tension on the fabric. (If you are lucky to have it- old window panes work
great for this- I was lucky that when I bought my house there were several large
pieces of plate glass in the garage.) AS it dries the paper will peel away from
the glass, if it doesn’t it cleans easily with soap and water.

There are many reasons to back your cloth with paper. First it
makes the fabric very easy to work with when binding, you fabric won’t stretch
when you glue it to you board. Secondly it keeps the color of the cloth true to
the fabric. Third, it decreases glue seepage. Fourth it makes a strong durable
bond of fabric to paper to board. There are several tutorials out there for
making book cloth with wonder under or other fusible interfacing. While it’s
fast and easy to use its more expensive and unknown in terms of it’s being
archival or acid free. (Let it be known here that I’m not an acid free freak.
There are books and paper out there that were made long before PH was
understood so my philosophy is that you can do what you want and most things
are going to outlive you and probably your children.


Img_4941

originality in binding

I wanted to write a little bit about originality. The topic came up on a discussion group I’m in because someone made a book with an unusual cover and someone else asked a related question using a related material. In this case the book was made with a cassette tape cover and the question was if one could use the actual tape to bind a book. Someone in the group responded immediately with the response of “Don’t make a cassette tape book, someone else in this group is already making one.”

First off I think the purpose of being in a group online is to gain ideas, learn new techniques and for inspiration. This person became INSPIRED by the previous poster’s materials and was using that as a springboard for their inspiration; in my mind exactly why one might join a group. Secondly, in terms of originality, we’re talking about a centuries old art/craft that is gaining a revival but that means that in some terms it’s all been done before. This wasn’t the first time I’ve seen a cassette tape book and I’m sure it won’t be the last. It’s been done before but that doesn’t mean that it can’t be done again in a new and original way. In this case- the 2 halves of the cassette were taken apart, attached to board and decorations placed on the board, original.

If I got my undies in a knot every time I saw a limp leather long stitch book, my feet wouldn’t have any circulation; ya know what I’m saying?  The simple fact is that when working with a centuries old art/craft you can’t get upset when you see something similar on the net. I’ve been putting my work online for over 6 years now and I’ve seen blatant rip offs of my patterns and designs, and I get pissed momentarily and realize that’s the permeability of the web, one of it’s great features. If I don’t want someone ripping off my design I shouldn’t put them up on the ‘net.  When I gain inspiration from someone I try and give them credit and I think that’s simply courtesy.

My main point is here is that bookbinding is a centuries old art/craft and essentially with the exception of a small handful of us, it’s all been done before. Even if you’re attaching something unusual to the covers of a book it’s been done. So can we all untwist our undies and get back to making and enjoying books?


covers

I meant to post some pictures about my hard covered books,
showing the covers before attachment. So here ya go:

Img_4918

This picture above is of the covers finished but not attached to a book block.

Img_4920

This shows one of the covers "inside" before additional support is added to the spine. My favorite additional support is tyvek. But you could add a nice washi paper of any paper really and glue it in along the spine. Then glue in teh book block.