Tag Archives: midori

Review: MD Paper Products Pencil B Grade

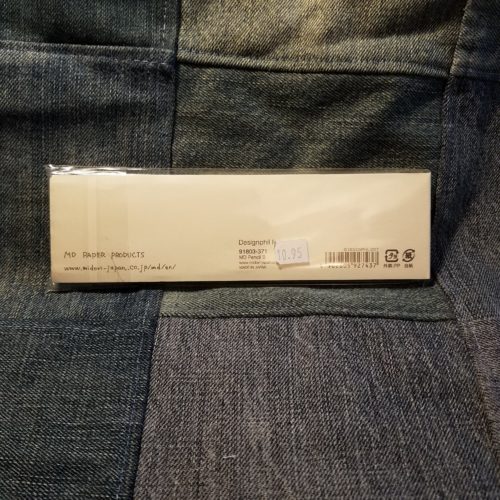
The Midori pencils have been around for awhile, and I snagged one in a swap but bought my first package of them while in Cambridge. You can find them online easily but also at Black INk in Cambridge, Massachusetts.

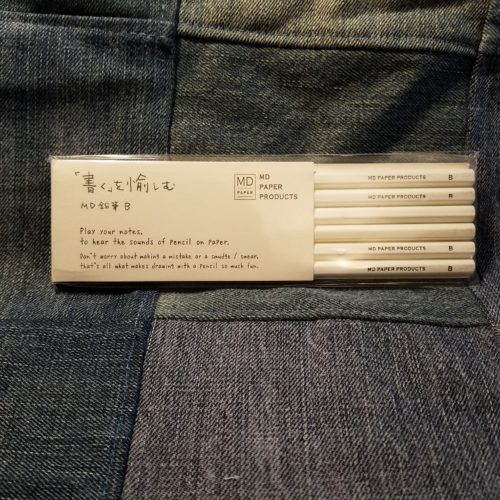
These pencils feature a cream colored matte finish over fabulously scented cedar. The imprint is in black and crisp. They are eraser less and the ends are not finished. Each end is ever so slightly domed. The domed ends are a lovely little detail, something I’ve come to expect from Midori products.

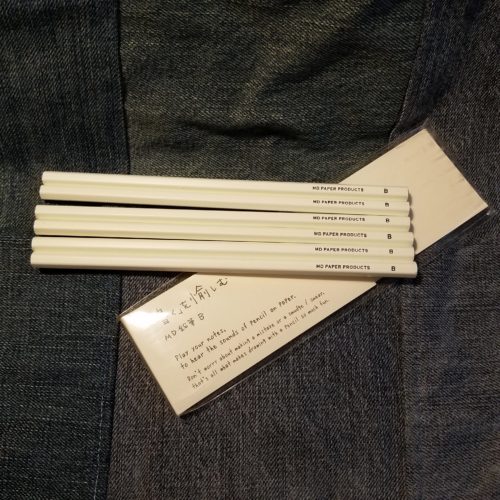
They sharpen well in every sharpener I’ve used, from Classroom Friendly to Masterpiece to Pollux. The cedar shaves off smoothly and the lead sharpens to a perfect point. The B grade core is darker and softer than many B grades. Compared to European pencils, like Staedtler I”d rate is a 3 or 4 B while in Japanese pencils I’d say it is closer to a Mitsubishi 2B. The core is silky smooth and reminds me of Mitsubishi pencils. It glides over the paper and lays down a nice dark line as I write. Sketching this pencil produces decent darks and lights, it won’t produce the darkest of darks, but it does a good enough job for general sketching.

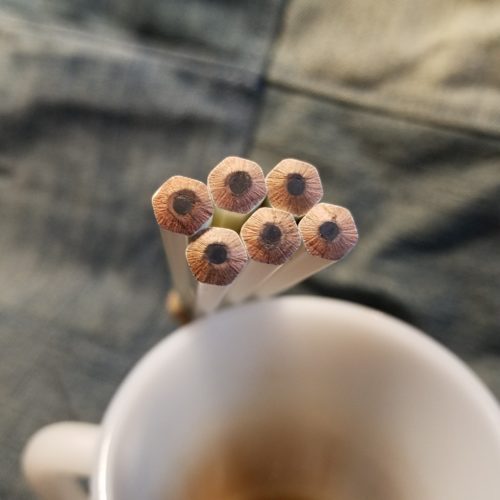
These aren’t the cheapest of pencils. I picked up a 6-pack for almost $11, still cheaper than Blackwing Volumes and around the same price as the regular Blackwings, with a vastly different look. Continue reading

New Field Notes Covers

I’ve been working on some prototypes of recycled sign vinyl covers for Field Notes. I’ve made a number of prototypes and have listed a few of them are for sale on my etsy shop. I’ve priced them below what the final design will sell. While they are perfectly serviceable there are little things that I want to change to make the covers better. However, you can get these for a good price. Mostly because they don’t make me perfectly happy. I’ve got some that hold 1 notebook, others that hold 3 and one that holds 4.

I’ve been toting around one that holds three for the last few weeks. The vinyl is a perfect for making a  cover for these notebooks, it’s sturdy and survives abuse. They are perfect for a vegetarian or vegan. Also the covers are recycled, so are ecologically minded.

Vinyl Notebook Covers Vinyl Notebook Covers Vinyl Notebook Covers Vinyl Notebook Covers Vinyl Notebook Covers Vinyl Notebook Covers Vinyl Notebook Covers

Fauxdori Traveler’s Notebook System, Fiscally Responsible?

A classmate took note of my fauxdori a week or so ago in class. After some discussion, she brought up something that I’m really surprised I didn’t think of, or consider about these things, she asked me if I saved money with the fauxdori over new notebooks/journals/sketchbooks. I had never thought of it that way.

I considered my sketching and journaling method previous to using the fauxdori. I either made or bought a Moleskine pocket sized sketchbook. These have 60 pages and around here cost about $10. As for written journaling I usually did that within the moleskine or in a separate moleskine Volant ($4.50 each) or Cahier ($3.30). * The Volant has 56 pages and the cahier 64. My daily carry cost was between $12 to $15.

 My current sketchbooks are BanditApple Carnet (BAC) PeeWee. These have 64 pages each. These cost between $3- $3.50 each depending on where I purchase them. For writing I use a Field Notes book and these run about $3.30 each. So I’m spending about $7 on inserts. Clearly there is a savings in just one bundle of inserts. fauxdori

My current rate for filling a BAC is 1 a month. Considering that they have a few more pages than a Moleskine Sketchbook. I’m already saving. If I were purchasing one Moleskine or HB a month  I’d be spending $120 to $144 on sketchbooks alone in a year. I’m filling a Field Notes every 16 to 20 days, depending on to do lists, journaling, and assorted school type stuff. A Field Notes is only 48 pages compared to the volant’s 56 or the cahier’s 64. that being said I always had issues with the last pages of my cahiers falling out and the spine of the my volants tearing and needing repair. I’ve yet to damage a Field Notes to that degree. Part of that is I’m not carrying them around outside of a cover but also, they spend less time in my pocket due to the fewer pages. I’d call this aspect even.

The answer to my classmate’s question of a fauxdori being fiscally responsible is, yes, it is. I save about $80 by not buying a moleskine/handbook every month. I also save myself a lot of aggravation. The cover allows the books to really be treated quite roughly. I’m able to carry both books in my back pocket, sit on them and generally abuse them more than I would be able to otherwise. So I’m saved from gluing up spines, falling out pages, and other nuisances.

It’s probably humorous that I turn around and spend that saved scratch on other things, like sketching pencils and pens… Right?

Continue reading

Another Midori Traveller Notebook Knock Off Idea

I wanted to add 2 more journals to my MTNKO. I saw a blog post somewhere, I cna't remember the blog that added a additional pockets to the notebook through the use of a rubber band. I decided to use that idea to add 2 more notebooks. I wanted to have my general idea notebook, a notebook for PioP and another sketchbook. To do this hack you'll need the following:

A medium length thin rubber band or a loop of the elastic you used to make you MTNKO

2 Notebooks

Slide the rubber band through the center of one notebook then the other,so they are attached spine to spine. Slide one notebook under the notebook already in your MTNKO.

Here's a helpful video of the process.


Chip off the old Midori Traveller

I liked my large sized Midori Traveller Notebook knock off (TNKO) so much I decided to make a pocket sized version to hold a few jotters. Once I made it I realized I could wedge my Canson Blue Book into it and make my art and not taking need marry into one refillable slab of leather. And it works, marvelously, perfectly and addictively. I’ve sketched, journaled and made notes in nothing else* since I made this thing. Oh baby. I took the leather from the first incarnation of the 6×9 inch TNKO and recolored it with artist grade artist paints in a couple of shades of brown. Then impregnated, that sounds dirty, it’s not but it is kinda messy, the leather with cold wax and then straight up bee’s wax and heat. This leather is waterproof and so soft and smooth it’s awesome. I’m pretty amazed at how well it came out. I didn’t know what to expect when I hit it with some wax and light heat, I knew it would take it and take it well but I was shocked to see how well.
P4074027
I also stitched a pen loop and a pocket into the back, a pocket may end up in the front as well. I’ve started to stuff random things into the pocket- business cards, receipts, stickers and scraps of paper that I acquire throughout my days. Under the elastic my iPoo is comfortable along with a pen. It’s really allowed me to pare down my on the go journaling needs to a journal, a jotter and a pen or 2. I’ve got more to write about concerning pared down journaling and how it’s really opened my mind to possibilities.
P4074030

Continue reading

State of the Weekend

It’s been a crazy few weeks. I had to help count inventory a while back for the DayJob and it threw me for a loop. I’ve been trying to get back on track ever since I was sick and having my schedule screwed up really just put me back to spinning my wheels in the rut again. This weekend was a good one for getting me back into the flow of things. Jane and I met and had a good cuppa at one of my favorite places, Atomic and then we took a walk in the park here in town. Where I sat and sketched and we talked about PioP, which is shaping up to be really really cool. I can’t wait for the reveal of what it is. It’s going to be awesome.
Photo1
This is the first sketching I’ve done in awhile. I could make a lot of excuses but I won’t. Honestly life has been flying at a million miles an hour and I find that instead of sketching or arting I make a few notes in my journal or veg out watching Hulu* at the end of the day. Fortunately though those notes are all forward progress, important tidbits of information. I’m looking forward to sharing those with you once everything is in place.
P4154086
I picked up a copy of Kerri Smith’s new book, “Finish This Book.” I’ll have a review on it here soon.I’ve also picked up a bunch of new fountain pens, some inks, a brush and a few other odds and ends. Hopefully this week I’ll get to writing up a bunch of reviews. That means I’ve got Thursdays covered. Hopefully I’ll be back on track with my blogging as well as my journaling. I've also been attempting to practice some "ultra light weight" journaling/sketching. It's centered around my Midori Traveller knock off. I"ll get a post up about that too. Lots of good stuff is in the works.

Continue reading

Midori Traveler Style Notebook

I've been using a knockoff of the Midori Traveler notebook system for about a year now. I decided to make one for a friend and while I was working on it  I tried a few things and really liked how it turned out. I then decided to make myself  a new one and a pocket sized version.

P4074033
I really like how deep and dark the leather is and how supple it's surface is while remaining stiff. I can't wait to put these through the ringer! For the large I used an edge of the hide that had numbers and letters cut into the surface. I buffed a ton of cold wax into the surface, which I used a light iron to heat into the leather, to really deeply impregnate it with the wax

P4074027
P4074027
This time instead of punching a hole directly through the center of the cover I made 2 holes, one on either side of the "spine" area. This lets me use a smaller knot and I like how it holds things together.

While I was at it, I figured I'd make myself a strap for my camera. I made it a touch too long but  I do like it. The hardest part was finding a heavy duty clasp to hold it to the camera.

P4074021
Some construction notes: For thelarge notebook I started with a 9×13 inch sheet of leather and then trimmed it once I had the cover constructed. For the small I started with a 6×9 inche sheet of leather, which I again trimmed down excess once I had the elastic installed. In both of mine I'm using my own notebooks but the small would hold any 3.5×5.5 inch notebook, like a Moleskine Cahier, Doane pocket notebook, Bandit Carnet, field notes etc… Any of the small pocket sized notebooks would fit in the small size, and likewise for the large, any 5.5×8.5/9 inch sized notebook would fit.

UStream Monday: Midori Traveler Knock-off Supply List

I’ll be streaming this live on my Ustream channel Monday 1/10/11 at 6pm EST.

If you want to follow along here are the materials:

  • A 9x12inch piece of 4 ounce or heavier leather.  Don’t get upholstery leather unless you want to back it.
  • Ruler
  • Hole Punch or Awl
  • Exacto or Click Knife
  • Hammer
  • Eyelets and setting tool (not absolutely necessary
  • Thin elastic cord- 2 pieces one 33 inches and one 12 inches
  • Sharpie for marking where to cut.

You’ll need to cut a 9×12 inch piece of leather. If you have a leather shop in your area most likely they can cut a chunk for you. You can also look for heavier leather on eBay. I’ve seen a few sellers on there selling exactly the kind of leather you’ll need for this. Try looking for latigo leather or Leather 4 oz. You’ll find something. You can also contact a shop and see if they will cut a piece to size for you.

Find the center of each long side. We’ll be punching a hole at the top and bottom of the piece as well as a hole in the very middle of the leather. Then 2 more holes 1/8th of an inch from the first hole. Then one to lace through.  This will make sense in the video.

After that we’ll use a few eyelets to support the holes and then thread the cord through the holes.

The 9×12 size is perfect for a moleskine cahier in the 6×9 size or my handmade jotters. I’ve also successfully carried the manuscript for my book stapled in a corner, folded in half then threaded under the elastic. Protects and holds it all together. It holds 3 elastics to hold notebooks.

Now keep in mind I’ve never seen a midori traveler in person, this is my version of their product from looking at online images. I use it primarily to hold all the handwritten notes in the various notebooks together in one place as well as my planner. I don’t know how their threading works.

Some ideas to add to this: if one wanted a stiffer back cover, a pocket could be sewn in and a piece of stiff card stuck in it. Backing the leather could add to the stiffness. I like the raw leather I’ve used as I can run acrylic paint into it to get a nice color change. The size of this can be adapted to ANY size notebook. Want one for a pocket sized? Measure the cover size, double then add an inch and a half  to get the long side. For the short side add a half inch. (3×5 would get a 5.5×7.5 cover piece)

Anyway tune into the show tomorrow night, or if you can’t make it watch the video!

See the video here:


Faux Midori Traveler

<p>So this weekend (or was it last week) I made a Midori traveler knock off. Essentially I really liked the idea of the Traveler system but hated the idea of being tied into weirdly sized notebooks; also the price tag of $40USD was a tad to steep for me. So I took a look at the system- a sheet of stiff leather, hole dead center for the closure and 2 holes at the center of each long side with a piece of elastic cord threaded through the holes. Easy to replicate.</p>
<p>For my first UStream show in January I’ll be showing you just how to replicate this thing, it’s ridiculously easy. You’ll need to buy some leather to follow along. You’ll need to get a square foot of leather. There are loads of sellers on eBay selling all kinds of leather. You will want a stiff cow hide for this. Latigo is great because it’s been stiffened and colored. It’s also very expensive. You can get away with buying cheaper leather in the 5 to 7 oz range, mine was 4 oz and pretty stiff. If you get thinner or softer leather you’ll need to back it and we’ll discuss that in my show. Goat hide is also stiff enough to use for this project though usually pretty thin. Pick a color of leather you like and realize that its color will change over time- both as it ages but also from you handling it. However if you buy a tan color or even a chocolate brown color and you find you don’t like it when it arrives, don’t fret, you can change the color easily with acrylic paint.</p>
<p>Sheep hide is super soft and really nice to hold, but it’s not stiff at all and you will have to back it to make this cover usable. The same goes for deer hide, lovely stuff but again you’ll need to back it.</p>
<p>By backing the leather I mean that you’ll need to glue a sheet of paper or fabric to the back side of the leather. The glue and paper/fabric will stiffen the leather enough that you create a usable cover.</p>
<p>If someone is selling a “split” it is suede. Again, lovely stuff but not suitable for this project, not to mention that suede is a beast to work.</p>
<p>The first cover I cut was about a half inch too short, so I made myself another. I’ve got to say for a project that comes together in about 20 minutes start to finish that it’s really quite presentable and useful. My little notebooks get knocked around in my bag all day long and frankly I can see that this is protecting them. Having the 3 notebooks inside gives it some weight but also adds additional stiffness to the whole package. I could if I wanted to fold the pages over and write in it in my hand. The 6×9 size would be a little awkward but still easily done.</p>
<p>With the elastics properly tightened I can write on both pages, both sides without issue when sitting at my desk. It’s comfortable and the margin doesn’t get in the way. Even if the fold did get in the way I’d easily be able to remove the current notebook and write.</p>